CHAPTER 143
Laceration, Simple
Presentation
The patient may have been accidently cut by a knife, glass shard, or other sharp object, which resulted in a clean, straight wound (Figure 143-1). Impact with a hard object at an angle to the skin may tear up a flap of skin. Crush injury from a direct blow may produce an irregular or stellate laceration with a variable degree of devitalized tissue, abrasion, and visible contamination. Wounds may involve vascular areas of the face and scalp, where the risk for infection is low, or the extremities where infection becomes a greater risk, along with the possibility of tendon and nerve damage. The elderly and patients on chronic steroid therapy may present with “wet tissue paper” skin tears following relatively minor trauma.
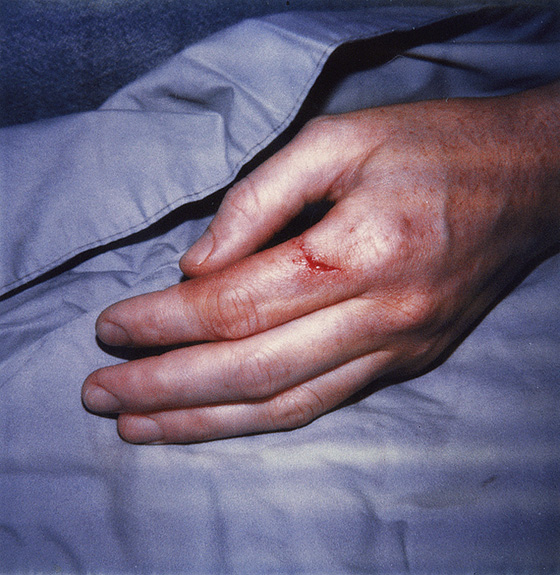
Figure 143-1 Simple laceration.
What To Do:
 A history should establish the approximate time of injury. Risk for infection increases as the length of time from wounding to repair increases. A report of a sensation of “something in the wound” should be taken seriously. Frequently, the patient’s perception is correct.
 Determine the exact mechanism of injury, which should alert you to the possibility of an underlying fracture, retained foreign body, wound contamination, or tendon or nerve injury. Chin lacerations are associated with mandibular fractures. A fall onto gravel, glass fragments from automobile windshields, lacerating glass shards, or sharp wooden or plastic fragments may produce buried foreign bodies. Wounds occurring in natural bodies of water will be contaminated. Forceful injuries caused by a sharp metal or glass edge are most likely to cause tendon or nerve lacerations.
 Investigate for any underlying factors associated with the patient that may increase the risk of wound infection. These include conditions such as diabetes, peripheral vascular disease, malnutrition or morbid obesity, acquired immunodeficiency syndrome (AIDS), alcoholism, and renal failure. Patients on chemotherapy or who are taking chronic immunosuppressive doses of corticosteroids are also at increased risk. When these risk factors are present or there is a high degree of bacterial contamination, especially with soil or other debris, early administration of prophylactic antibiotics should be considered. Open fractures and exposed joints or tendons are other instances for which antibiotics should be used. In general, decontamination is far more important than antibiotics. Most simple lacerations should not receive prophylactic antibiotics. Antibiotics are justified for infected wounds or when foreign body removal must be postponed.
 Inquire whether there are any allergies to anesthetic agents or antibiotics.
 Ask about tetanus immunization status and provide prophylaxis where indicated (see Appendix H). The elderly, immigrants, and people with limited formal education are more likely than the general population to have low tetanus protection.
 Wound examination should always be conducted under optimal lighting conditions and with minimal bleeding. Place the patient in a comfortable supine position and stabilize the injured part. The treating clinician should be seated in a comfortable position.
 Inspect and palpate for embedded foreign bodies, and check for sensation and motor function distal to the laceration. When lacerations continue to bleed despite reasonable direct pressure, a sphygmomanometer can be placed proximal to the injury and inflated to a pressure greater than the patient’s systolic blood pressure. This will allow proper examination in a bloodless field.
 Test tendon function against resistance. If function is weak or intact but there is pain, suspect a partial tendon laceration. Inspect the tendon through a full range of motion. For injuries to the hand, test the function of the flexor digitorum profundus and superficial tendons separately. Test skin sensation distal to the laceration and note any diminished sensitivity. Tendon and nerve lacerations deserve specialty consultation. The following also require surgical consultation: joint capsule disruptions; repair of specialized structures, such as the parotid or lacrimal duct, eyelid margin, or tarsal plate; extensive injuries; or those involving significant tissue loss.
 Consider imaging studies if there might be a retained foreign body. Most glass fragments will be revealed on ordinary radiographs. CT scanning can detect more types of foreign material than plain film radiography, and high-resolution ultrasonography has been very successful in detecting various types of soft tissue foreign objects.
 Consider procedural sedation and analgesia for children. Follow your hospital protocol (see Appendix E).
 Children may also benefit from a topical anesthetic agent, especially for scalp and facial lacerations. Lidocaine 4% plus epinephrine 1:1000 (0.1%) plus tetracaine 0.5% (LET) is safe, effective, and inexpensive. Put 3 mL on a cotton ball and press firmly into the wound for 20 to 30 minutes, either with tape or with the parent’s gloved hand. After removing the cotton, test the effectiveness of the anesthesia by touching with a sterile needle. If any sensitivity remains, infiltrate the area with buffered lidocaine, as described later. Adding 150 mg of methylcellulose to the 3 mL of LET will convert this solution into a gel that can be applied directly into the wound, and it does not require cotton to hold it in place. Either preparation can be applied when the patient first arrives.
 When a local anesthetic is required for cleansing, inspecting, and/or repairing a wound, buffer plain lidocaine 1% (Xylocaine) solution by adding 1 mL of sodium bicarbonate solution to every 9 to 10 mL of lidocaine and allow it to approximate body temperature in a pocket. Buffering and warming reduce the pain of injection. The maximum safe dose of lidocaine is 4.5 mg/kg (up to 300 mg). Bupivacaine (Marcaine) is slightly slower in onset but has a much longer duration of action and may be useful for crush injuries and fractures where pain is expected to be prolonged beyond closure of the laceration. Bupivacaine cannot be buffered with as much bicarbonate as lidocaine, because it precipitates in alkaline solution. Only 0.1 mL of bicarbonate should be used per 10 mL of bupivacaine. Epinephrine is sometimes added to lidocaine on the face for its short-lived help with hemostasis and duration of anesthesia, but its benefits should be weighed against the disadvantage of increased pain on injection and its potential for possible slower healing and subsequent increased infection rate. Bicarbonate inactivates epinephrine.
 To further reduce pain, inject subdermally very slowly. Begin inside the cut margin of the wound, avoid piercing intact skin, work from the area already anesthetized, and use a 27- or 30-gauge needle on a 5- or 10-mL syringe. Also, repetitive pinching of the skin during lidocaine infiltration reduces patient discomfort (Figure 143-2).
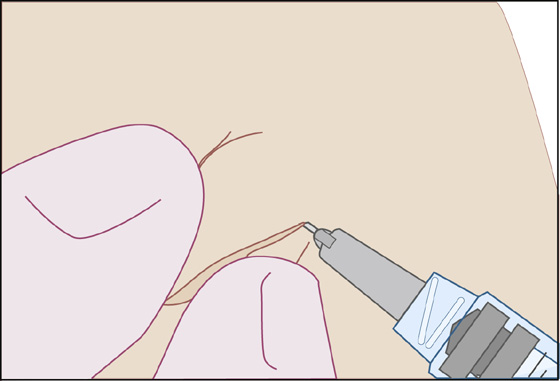
Figure 143-2 Demonstration of the pinching of the skin with the thumb and forefinger, just behind the area of injection with the anesthetic. Note the perpendicular relationship of the needle to the thumb and forefinger. (Adapted from Fosko SW, Gibney MD, Harrison B: Repetitive pinching of the skin during lidocaine infiltration reduces patient discomfort. J Am Acad Dermatol 39:74-78, 1998.)
 Use regional blocks to avoid distorting tissue or where there is no loose areolar tissue to infiltrate, such as the fingertip (see Appendix B). Some data suggest that percutaneous facial regional nerve blocks were more painful and less effective than local infiltration.
 Clean the wound after anesthesia is complete. Superficial lacerations with little or no visible contamination, facial lacerations, and scalp lacerations may be cleaned by gentle scrubbing with a gauze sponge soaked in normal saline or a 1% solution of povidone-iodine. (Dilute the stock 10% Betadine 10-fold with 0.9% NaCl.) Deeper contaminated lacerations may require pressure irrigation with a syringe and splash shield, such as ZeroWet or Splashield, using the same 1% povidone-iodine solution or plain saline. A 35-mL syringe attached to a 19-gauge needle or plastic catheter (Angiocath) will also be effective. Heavily contaminated wounds can first be cleaned using a gauze sponge and a nonionic surfactant cleanser (Shur-Clens). Studies have shown that there is no greater risk for infection when a wound is irrigated with tap water. A constant high-pressure flow from a faucet is a cheap alternative to jet lavage and eliminates the need for syringes, splash guards, and basins. Warm or lukewarm water should be used for patient comfort.
 All remaining visible debris, foreign bodies, and devitalized tissue must be removed, either by using forceps, by scraping with the edge of a scalpel blade, or by excision with scalpel or scissors. Cosmetic considerations will influence the degree to which facial lacerations are débrided. Excision of contaminated nonviable wound edges should be kept to a minimum on the face, with tissue preservation being of primary concern.
 Hair generally does not need to be removed. When necessary, shorten hair with scissors rather than shaving with a razor.
 Simple lacerations seldom require special techniques for hemostasis. Direct pressure for 10 minutes, elevating the affected extremity, correct wound closure, and a compression dressing should almost always stop the bleeding.
 Examine the wound again, free of blood and with good lighting. Examine any deep structures, such as tendons, by direct visualization through their full range of motion, looking for partial tendon lacerations. Remember that the extensor tendons of the hand are very superficial and are highly susceptible to laceration. If there is any question about a partial tendon laceration, splint the wound and obtain orthopedic consultation.
 If the wound has been heavily contaminated with debris, is crushed with devitalized tissue, or has been exposed to pus, feces, saliva, or vaginal discharge, consider excising the entire wound and closing the fresh surgical incision, if practical. Otherwise, provide for open management by loosely packing with sterile fine-mesh gauze covered with multiple layers of coarse absorptive gauze, after soaking them in normal saline or, in highly contaminated wounds, a 1% solution of povidone-iodine. Unless the patient develops a fever or has increasing pain or purulent discharge from the wound, leave the dressing undisturbed for 3 to 5 days, when the risk for infection decreases. Have the patient begin cleaning the wound with mild soap and water in 24 to 48 hours. If there are no signs of infection, the granulating wound edges may then be approximated as a delayed primary closure.
 Close the wound primarily only if it is clean and uninfected. The maximum “golden period,” within which time the wound must be closed, is highly variable. Each individual laceration should be considered separately, taking the time from injury to presentation into account along with location, contamination, risk for infection, and importance of cosmetic appearance, before deciding whether to perform primary wound closure. The generally accepted “golden period” is from 6 to 10 hours, whereas recent data indicate that for clean wounds, this period might safely be extended to 19 hours. Facial wounds may be closed up to 36 hours after injury. Minimize the amount of suture material buried inside the wound: the less suture used, the less chance of infection.
Wound Closure Options
Steri-Strips
 Wound closure tapes (Steri-Strips) and tissue adhesives offer the lowest risk for infection and are most successfully used on simple superficial lacerations with minimal tension. Tape strips are the closure material of choice for “wet tissue paper” skin tears. Before application, degrease the skin with alcohol wipes, being careful not to get any alcohol into the wound. An adhesive agent such as tincture of benzoin may then be thinly applied to the skin surrounding the laceration (again, avoiding the open wound). Push the wound edges together and apply the tape to maintain approximation (Figure 143-3). An alternative to Steri-Strips alone for “wet tissue paper skin” repair is to use Mepitel (Mölnlycke Healthcare, Dunstable, UK), either in combination with Steri-Strips or alone as a porous semitransparent dressing. This material is coated with soft silicone that creates a gentle adhesion between the dressing and the intact skin. Mepitel is placed over the wound after the wound edges have been approximated and is then covered with a standard absorbent dressing. The Mepitel is left in place until wound healing has occurred.
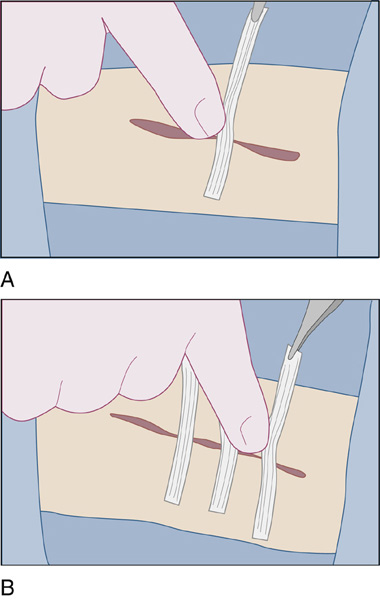
Figure 143-3 A, The tape is placed on one side of the wound at its midpoint while the clinician grasps it with forceps in the dominant hand. The opposite wound edge is then gently apposed by pushing with a finger of the nondominant hand. B, The remaining open sections of the wound are bisected by additional tape strips until the strips are within 2 to 5 mm of each other. (Adapted from Singer AJ, Hollander JE: Lacerations and acute wounds. Philadelphia, 2002, FA Davis, 2002.)
Topical Skin Adhesive
 Cyanoacrylate topical skin adhesive (Dermabond, Indermil, Epiglu) can be used with small wounds in a location that does not allow the application of a length of wound closure tape. These adhesives can also be used in combination with the tape strips (Figure 143-4). Tissue glues, like tape closures, are rapid and relatively painless to apply; therefore they generally do not require the use of a painful local anesthetic. There is also no need for suture removal. In addition, cyanoacrylate tissue adhesives have a barrier function against microbial penetration and serve as an optimal wound dressing that creates a moist environment, thus enhancing wound healing.
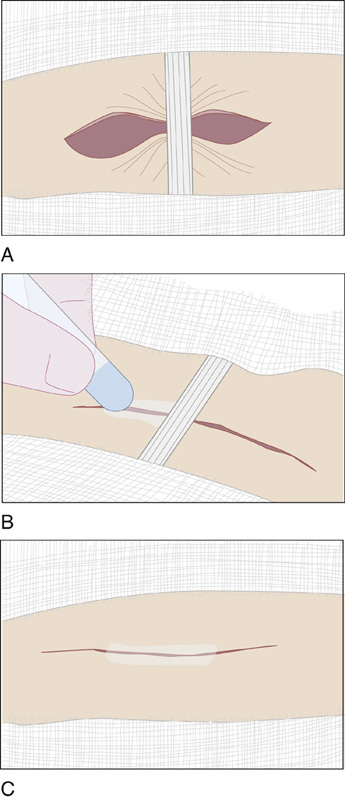
Figure 143-4 Closing a long or complex wound. A, The wound is bisected with a strip of surgical tape. B, The wound limbs on either side of the tape are glued. C, The strip is removed, and the central portion of the wound is glued. Some practitioners prefer to leave the tape strip and apply the adhesive over it. (Adapted from Singer AJ, Hollander JE: Lacerations and acute wounds. Philadelphia, 2002, FA Davis.)
 With the wound edges completely dry and meticulously approximated, the adhesive is carefully expressed through the tip of the applicator and gently brushed over the wound surface, covering 5 to 10 mm on either side of the wound edges (Figure 143-5). Initially, only a thin layer should be applied, because thicker layers may result in release of unpleasant heat as the glue polymerizes. After allowing the first layer of the adhesive to polymerize for 30 to 45 seconds, two to three additional layers should be applied, waiting 5 to 10 seconds between successive layers. Usually reserved for low-tension wounds, tape closure strips and tissue adhesives can be used over areas of moderate skin tension if an appropriate immobilizing dressing or splint is applied. Otherwise, simple wound coverings are optional. Ointments should not be used, because they will loosen the adhesive. The patient’s wound is allowed to get wet briefly each day during showering or bathing.
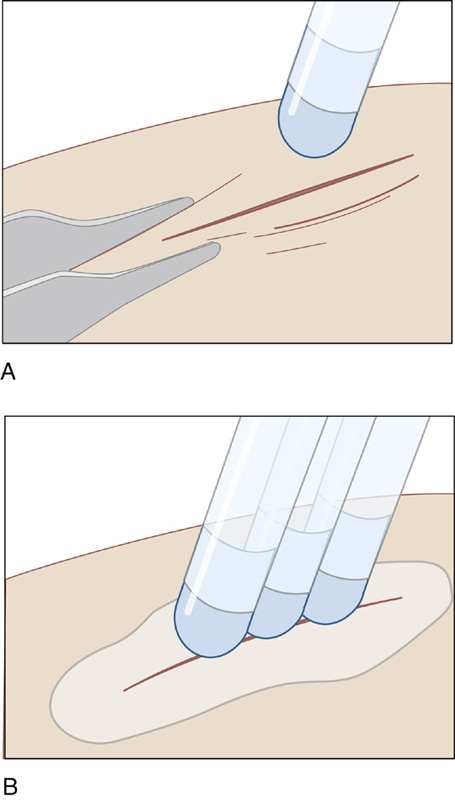
Figure 143-5 A, To prevent inadvertent runoff of the Dermabond adhesive, position the wound in a horizontal plane. Manually approximate the wound edges with forceps or gloved fingers. Use gentle brushing strokes to apply a thin film of liquid to the approximated wound edges, and maintain proper eversion of skin edges as you apply Dermabond adhesive. The adhesive should extend at least ½ centimeter on each side of the apposed wound edges. Apply Dermabond adhesive from above the wound. B, Gradually build up three or four thin layers of adhesive. Ensure that the adhesive is evenly distributed over the wound. Maintain approximation of the wound edges until the adhesive sets and forms a flexible film. This should occur about 1 minute after applying the last layer. (Adapted from Singer AJ, Hollander JE: Lacerations and acute wounds. Philadelphia, 2002, FA Davis.)
Staples
 Most scalp lacerations and many trunk and proximal extremity lacerations that are straight, without edges that curl under (invert), can be most easily and rapidly repaired using skin staples. However, staples do not allow meticulous repairs and should not be used in areas of cosmetic concern. Push wound edges together and staple so that edges evert slightly. Hair does not interfere with this technique and does not cause a problem if caught under a staple.
Hair Approximation Technique
 With simple linear scalp lacerations, where the hair is at least 3 cm long and there is no active hemorrhage, closure can be obtained without using any anesthesia by using the hair apposition technique with tissue glue (Figure 143-6). Patients are able to wash their hair 3 days after repair.
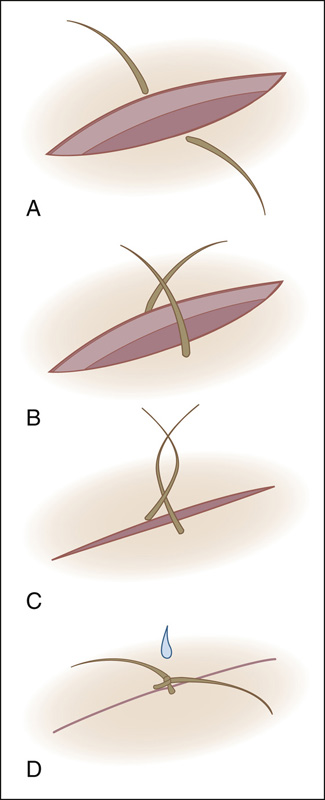
Figure 143-6 Hair apposition technique. A, Choose four to five strands of hair in a bundle on either side of the scalp laceration. B, Using artery forceps, cross the strands. C, Make a single twist to appose wound. D, Secure with a single drop of glue. (Adapted from Ong ME, Coyle D, Lim SH, Stiell I: Cost-effectiveness of hair apposition techniques for suturing. Ann Emerg Med 46:237-242, 2005.)
Suture
 For deep or irregular lacerations, or lacerations on hands, feet, and skin over joints, use a monofilament nonabsorbable suture, such as nylon (Ethilon) or polypropylene (Prolene) (either 4-0, 5-0, or 6-0), using the smallest diameter with sufficient strength. Deep absorbable sutures (Vicryl, Vicryl Rapide) assist in approximating wound edges by decreasing tension and lessening dead space in which transudate and blood could accumulate (Figure 143-7). Because of an increased risk for infection, one relative contraindication to deep suture placement is contamination of the laceration.
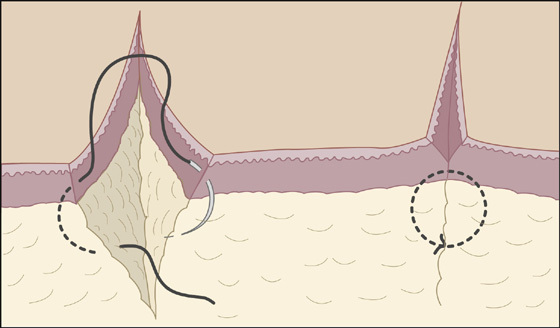
Figure 143-7 Absorbable intradermal sutures. (Adapted from Singer AJ, Hollander JE: Lacerations and acute wounds. Philadelphia, 2002, FA Davis.)
 A good strategy to realign skin and minimize sutures is to begin by approximating the midpoint of the wound and then bisecting the remaining gaps with subsequent sutures. Put known landmarks together first (e.g., vermilion border, flexion creases, wrinkles). Simple interrupted stitches in most body sites should be about 0.5 cm apart, 0.5 cm deep, and 0.5 cm back from the wound edge (Figure 143-8). Make each dimension 0.25 cm for cosmetic closure on the face. Angle the needle going in and coming out so that it grasps more subcutaneous tissue than skin. The wound edges should evert so that the dermis is aligned level on both sides, thereby minimizing visible scar. Tie each stitch with only enough tension to approximate the edges. A continuous running suture (Figure 143-9) is a more rapid technique of closing a fairly straight laceration. When there is wound edge inversion (where the wound edge curls under), the length of the wound edge can be completely excised, or vertical mattress sutures can be placed between simple interrupted stitches (Figure 143-10).
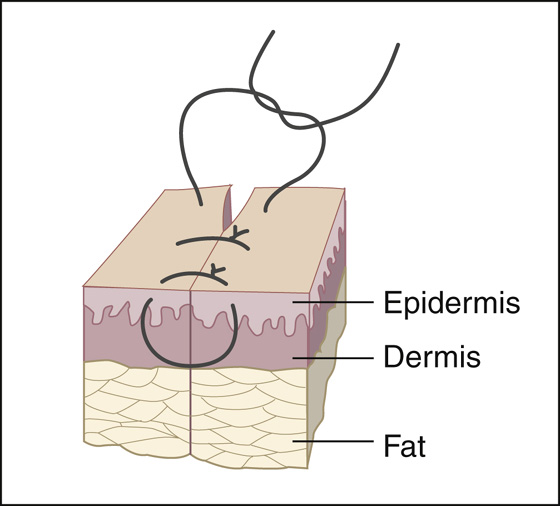
Figure 143-8 Simple sutures. (Adapted from Singer AJ, Hollander JE: Lacerations and acute wounds. Philadelphia, 2002, FA Davis.)

Figure 143-9 Simple running suture. (Adapted from Singer AJ, Hollander JE: Lacerations and acute wounds. Philadelphia, 2002, FA Davis.)
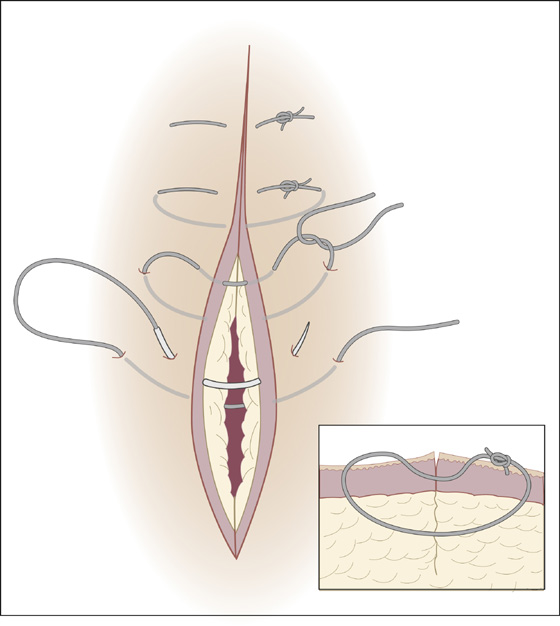
Figure 143-10 Vertical mattress suture. (Adapted from Singer AJ, Hollander JE: Lacerations and acute wounds. Philadelphia, 2002, FA Davis.)
 When small children require sutures in a location that will make suture removal very difficult, use polyglactin (Vicryl Rapide) absorbable suture material. Standard polyglactin (Vicryl) is more slowly absorbed and is more likely to cause discomfort or suture abscess.
 After closing the wound with sutures, apply bacitracin antibiotic ointment and a sterile protective nonadherent dressing, which will protect the wound from gross contamination and provide absorption, compression, and immobilization. Splint lacerations over joints. Scalp lacerations do not require messy ointment and may need a temporary compression dressing only if there is excessive bleeding or swelling. Facial wounds generally do not require special dressings but should be cleaned twice a day with half-strength hydrogen peroxide on a cotton-tipped applicator to prevent crusting between wound edges. This cleaning should be followed by reapplication of antibiotic ointment.
 Give patients clear, specific discharge instructions that explain the potential complications of their injuries, and tell them when and where to go for reevaluation and follow-up care.
 Schedule a wound check in 2 days if the patient is likely to develop any problems with infection, require dressing changes, or need continued wound care. Always recheck for sensory and tendon function distal to the healing wound after repair. Instruct patients to return at any time if there is bleeding, loss of function, or signs of infection (increasing pain, pus, fever, swelling, redness or heat). After 48 hours, most sutured wounds can be re-dressed with a simple bandage that can be easily removed and replaced by the patient, allowing a shower each day.
 Wound closure strips can be left in place until they fall off on their own. Additional tape can be applied if the original closure strips fall off prematurely. A transparent polyvinyl film dressing, such as OpSite or Tegaderm, can be applied over the closure strips when they are first applied to provide a waterproof cover. This must be removed if water gets under the transparent film dressing. Mepitel is an alternative dressing described above.
Suture Removal
 Remove facial sutures in 3 to 5 days to reduce the risk for visible stitch marks. The epidermis should have resealed by this time, but the dermis will not have developed much tensile strength; so, reinforce the wound edges with wound closure strips for a few more days.
 Most scalp, chin, trunk, and limb stitches should be removed in 7 days. Sutures may be left in for 10 to 14 days where there is tension across wound edges, as over the extensor surfaces of large joints. Sutures are easily and painlessly cut with the tip of a No. 11 or 12 scalpel blade or fine scissors and removed with simple smooth forceps (Figure 143-11). Cut alternate loops of running sutures when these are ready to be removed.
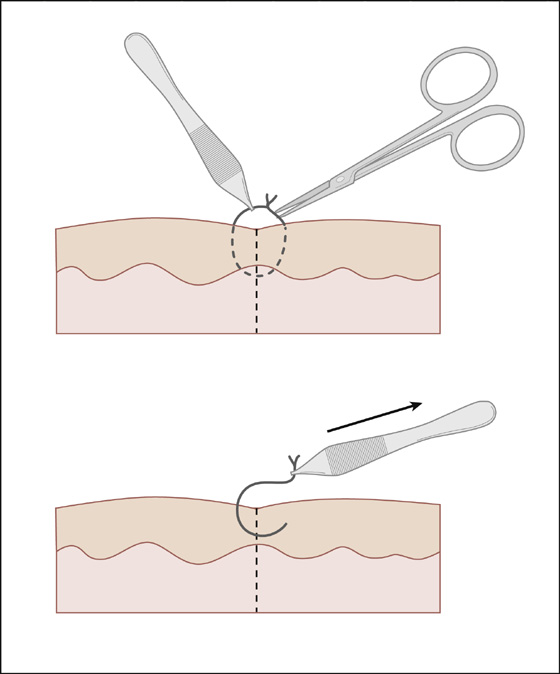
Figure 143-11 Simple suture removal. (Adapted from Singer AJ, Hollander JE: Lacerations and acute wounds. Philadelphia, 2002, FA Davis.)
What Not To Do:
 Do not prescribe prophylactic antibiotics for simple lacerations. Antibiotics do not reduce infection rates and only select for resistant organisms. Several clinical studies and a meta-analysis have found that there is no benefit to prophylactic antibiotics for routine laceration repair. Most infections can be easily treated when they occur. Limit prophylactic antibiotics to high-risk wounds.
 Do not close a laceration if there is visible or suspected contamination, debris, or nonviable tissue that cannot be adequately removed or if there are any signs of infection. Dress it open for delayed primary closure.
 Do not substitute antibiotics for wound cleansing and débridement.
 Do not rely only on direct wound examination when a foreign body is suspected by history. Obtain a radiograph, ultrasonogram, or CT scan to ensure that the wound is free of any foreign material.
 Do not use high-pressure irrigation with noncontaminated wounds. It is unnecessary and may even increase the risk for infection in clean wounds.
 Do not use undiluted skin cleansing solution, such as 10% povidone-iodine or any skin scrub containing detergents or soap, in an open wound. They kill tissue and can even increase the infection rate.
 Do not miss a hidden human bite. Any laceration over the knuckles of the hand should be considered a human bite until proven otherwise (see Chapter 144).
 Do not shave an eyebrow. The hair is a useful marker for reapproximating the skin edges and can take months to years to grow back.
 Do not remove too much skin or underlying tissue when débriding the face and scalp.
 Do not place tissue adhesives within a wound or between wound margins.
 Do not allow tissue glue to drip into the patient’s eye. When working near the eye, cover the lid with moistened gauze for protection. When available, high-viscosity Dermabond should be used. It is six times thicker than the original formulation and significantly reduces runoff.
 Do not use buried absorbable sutures in a wound with a high risk for infection.
 Do not insert drains in simple lacerations. They are more likely to introduce infection than prevent it.
 Do not apply ointments or petroleum jelly to wounds closed with tissue adhesives or sterile tape closures. This will cause these products to loosen prematurely and may lead to early wound dehiscence.
 Do not use Neosporin ointment. Many patients are allergic to the neomycin and develop a very uncomfortable allergic contact dermatitis.
Discussion
The most important goal of early wound care is preventing infection while attaining a functional closure with minimal scarring. Patients have these same concerns, along with the desire for the least painful repair. Development of wound infections, failure to detect foreign bodies, and missed injuries of tendons and nerves are common sources of litigation associated with lacerations. Careful history and wound examination, thorough cleansing, and débridement, as well as liberal use of delayed primary closure, all reduce these risks. One must strike a balance at times between excising enough tissue to prevent infection and not excising so much that a deformity will be created or limiting future options for elective scar revision. Always inform patients about your concern about possible wound infection, small hidden foreign bodies, or the delayed discovery of nerve or tendon injury. Always examine for these possibilities when rechecking a wound, and give patients realistic expectations about future scarring.
It is interesting to note that there is probably no clinically important difference in infection rates between using clean nonsterile gloves and sterile gloves during the repair of uncomplicated traumatic lacerations.
Nonabsorbable suture material is the standard for percutaneous use, because nylon and polypropylene are low-reactive materials with good tensile strength. This, of course, is also true for stainless steel staples. Staples should not be used in anyone who may need an MRI before removal. Their use should also be delayed if CT scanning is planned, because of the possible scatter artifacts the staples can cause.
Buried absorbable sutures are more reactive and, in animal studies of contaminated wounds, have been shown to increase the risk for infection. The placement of these sutures, however, has not been shown to increase infection in clean wounds.
Tissue glue is nonreactive and has the added advantage over sutures of being quickly applied and painless (a special benefit when children are involved). The clinician using these tissue adhesives must always use the same care in providing adequate wound cleansing as with sutured wounds. The limitations of the adhesive’s tensile strength and tendency toward wound dehiscence must also be taken into consideration. If cyanoacrylates get into undesirable areas, such as the eye, the glue can be removed with a petroleum-based product (e.g., ophthalmic bacitracin or erythromycin).
Surgical tapes are the least reactive of all closure techniques. They cannot be used in hairy areas, however, and they lose significant holding ability when wet.
Primary closure is the closure of a wound at the time of presentation. Delayed primary closure is the closure of a wound 3 to 4 days after the injury. Delayed primary closure should be used for heavily contaminated wounds or contaminated wounds in a host predisposed to infection. Wounds that are grossly contaminated or infected can be treated with wet to dry dressing or packing changes as often as two to three times per day to provide automatic cleansing and débridement. When the wound appears clean, without signs of infection, it can be closed typically within 3 to 5 days.
Healing by secondary intention is simply allowing a wound to heal without formal closure, other than in some instances applying a protective dressing. The primary advantage to this technique is its ease of use. The disadvantage is the associated delay in wound closure and possible increased scar size.
For some small wounds, this nonclosure technique may be most appropriate. Simple hand lacerations, less than 2 cm in length and without deep structure involvement (distal to the distal volar wrist crease), that have been left open without repair have been shown to heal without cosmetic or functional difference compared with primary closure.
Suturing, therefore, may not offer any advantages over simple cleansing and dressing of small hand lacerations. Healing by secondary intention may produce superior aesthetic results on concave surfaces of the face and ears (e.g., the medial canthal area, nasal alar crease, nasolabial area, and concave fossa and concha of the auricle). Where practical, those wounds may be covered with moistened cotton or gauze and held in place with a dressing to provide better wound edge alignment.
Patients will sometimes report a previous allergic reaction to a local anesthetic. True allergy to local anesthetics is extremely rare and usually involves the anesthetic’s preservative. Most often, an anesthetic from another class (amide or ester) can be substituted. Procaine or benzocaine (esters) can be substituted for lidocaine or bupivacaine (amides). These patients are often really allergic to methylparaben, the preservative used in multidose vials of lidocaine. When the type of anesthetic that caused the reaction is unknown, an alternative is to use an anesthetic agent that is unrelated to both esters and amides. Diphenhydramine diluted to a 1% solution is effective but painful to inject. Benzyl alcohol (a preservative in normal saline vials) in a 0.9% solution with epinephrine 1:100,000 is less painful to inject and is longer acting than diphenhydramine.
Ointments probably facilitate healing and reduce infection by their occlusive, rather than antibiotic, properties. White petrolatum may be as good as antibiotic ointment and avoids the risk for allergic reaction. When an antibiotic ointment is selected, neomycin-containing products (e.g., Neosporin) should be avoided because of their propensity for producing contact dermatitis. Options for dressings over the ointment have become numerous. It is unclear whether any one dressing is superior to the others; therefore personal preference and patient convenience should help determine which dressing material to use. In general, a dressing that protects a wound from contamination and, when necessary, provides mild compression and immobilization, along with absorption, while providing a warm moist environment is best to promote healing.
Permanent hyperpigmentation was observed in some wounds, caused by dermabrasion after excessive exposure to sunlight for the 6 months following injury. It is unclear whether this should be extrapolated to simple skin lacerations, but some clinicians recommend that sunscreens be used for several months to prevent hyperpigmentation.
Stay updated, free articles. Join our Telegram channel

Full access? Get Clinical Tree


