, Kevin Jones1 and Jeffrey Rea1
(1)
Trauma and Critical Care, R Adams Cowley Shock Trauma Center, Baltimore, MD, USA
Keywords
ProceduresIntubationCricothyrotomyTube thoracostomyDiagnostic peritoneal lavageLocal wound explorationFAST examPneumothoraxHemothoraxIntubation
Intro
Airway is the first concern after injury. The Eastern Association for the Surgery of Trauma (EAST) defines endotracheal intubation (ETI) as necessary in patients with airway obstruction, severe hypoxemia, hypoventilation, Glasgow Coma Scale ≤8, severe hemorrhagic shock, and cardiac arrest. EAST also emphasized the need for ETI in patients with smoke inhalation with evidence of airway obstruction, major cutaneous burns (>40 % BSA), moderate to severe facial burns, or airway injury appreciated on endoscopy [1]. Other patient candidates for ETI include patients with facial or neck injury, persistent combativeness and concern for brain injury, and cervical spine injury with evidence of respiratory insufficiency.
Technique
Rapid sequence intubation (RSI) is used for emergent intubation in the critically ill trauma population. RSI is the simultaneous administration of both an induction agent and a paralytic to facilitate ETI. The bag valve mask should be applied to the face, and the patient should be passively preoxygenated with 100 % oxygen using a jaw thrust or chin lift to open the airway. Active bagging should be avoided. When done properly, RSI decreases the risk of complications including vomiting and aspiration while increasing the rate of successful intubation to approximately 98 % [2].
The most common technique utilized in the trauma patient is direct laryngoscopy with cervical spine precautions. The laryngoscope is placed into the mouth, sweeping the tongue to the left of the oral cavity and inserting the tip of the laryngoscope blade into the posterior pharynx. The vocal cords and arytenoids should be seen. If the epiglottis is seen overhanging the larynx, the laryngoscope should be further advanced into the vallecula to reveal the vocal cords. The endotracheal tube is introduced, passing directly through the cords and advanced to approximately 21–24 cm from the teeth. The balloon should be inflated and the endotracheal tube secured. Color capnography should be attached to the endotracheal tube, and color change should be demonstrated on 6 successive breaths. The oxygen saturation probe should be properly attached to the patient and continuously monitored. If present, end-tidal CO2 should be monitored. The intubator should auscultate breath sounds and should observe the chest wall to visualize chest rise and fall with ventilation. A chest radiograph should ensure proper location of the endotracheal tube in the trachea [3].
For patients in which there is concern for, or a known, unstable cervical spine fracture, intubation should be preferably performed by an anesthesiologist or other skilled operators using a fiber-optic scope to prevent fracture displacement and/or worsening spinal cord injury.
Outcomes
Intubation is a well-tolerated and successful procedure if performed by an experienced individual.
Complications
Peri-intubation emesis and aspiration are likely the most common complications of intubation. Patients who are properly medicated prior to intubation have decreased complications including vomiting, aspiration, airway trauma, and death [4].
The difficult airway can often be handled using adjunctive airway devices like the gum elastic bougie to facilitate endotracheal tube placement or a laryngeal mask airway (LMA). The LMA is not considered a definitive airway, but can oxygenate and ventilate patients, while a definitive or surgical airway can be established.
The difficult airway may require placement of an emergent surgical airway. Transtracheal jet ventilation, needle cricothyroidotomy, and other emergent, invasive airway rescue techniques can be used to rescue the difficult airway, but these methods require highly skilled and well-versed physicians to be successful. Cricothyroidotomy is the preferred intervention for failed endotracheal intubation [5].
Cricothyrotomy
Intro
Cricothyrotomy is the preferred procedure for establishing an emergent surgical airway. When attempts at orotracheal intubation fail, and a patient cannot be adequately ventilated by alternate means, the immediate solution is a cricothyrotomy. Emergent surgical airways are rarely needed, in one study accounting for 0.3 % of urgent and emergent airways [6].
The landmarks for cricothyrotomy are easily palpable in an adult, making the procedure one which can be performed entirely using tactile input. The risk of esophageal injury is minimal, as the posterior wall of the airway is completely encased by the cricoid cartilage. The risk of injury to blood vessels or the recurrent laryngeal nerve is also minimal, as the lateral aspects of the cricothyroid membrane are bounded by the inferior horns of the thyroid cartilage. The cricothyroid membrane is superior enough to be away from the thyroid isthmus or superior thyroid arteries and veins.
A number of prepackaged kits exist for the purpose of performing percutaneous cricothyrotomy. These kits utilize a Seldinger technique of first introducing a needle, then a wire, and then a series of dilators, ultimately followed by a kit-specific airway device, through the cricothyroid membrane. The open surgical technique has advantages over these percutaneous kits and has been demonstrated to be superior in the simulated environment [7].
Technique
As time and patient stability allow, prep and drape the anterior neck. Grasp the patient’s larynx between the thumb and middle finger of the nondominant hand. This “laryngeal handshake” will provide a continuous reference to midline, throughout the procedure. Identify the thyroid and cricoid cartilages, as well as the cricothyroid membrane between them. Make a vertical incision extending from over the mid-thyroid cartilage to over the mid-cricoid cartilage. In larger individuals, a larger incision may be required to define the anatomy. With the blade oriented horizontally, insert the scalpel blade straight through the middle of the cricothyroid ligament, penetrating 2–3 mm. Incise the membrane to the lateral margins where it is bounded by the cartilaginous structures of the thyroid cartilage (Fig. 6.1). Dilate the opening with a finger or the handle of the scalpel. Insert the tracheal hook, and retract the laryngeal cartilage, anterior, and cephalad (Fig. 6.2). Insert the airway (Fig. 6.3). Here we use a 6.0 ETT, but a 6.0 internal diameter Shiley or similar tracheostomy device will also work. Once the airway is through the cricoid cartilage into the trachea, remove the tracheal hook. Ventilate and confirm airway position with end-tidal CO2.

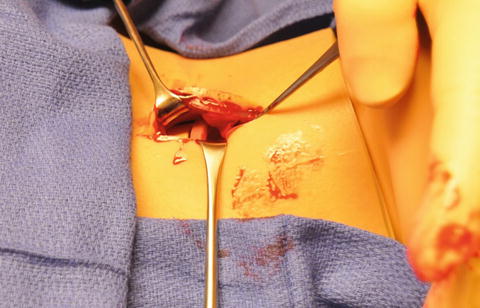
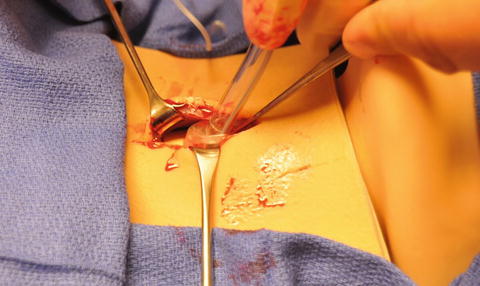
Fig. 6.1
Incise the cricothyroid membrane laterally in both directions to the margins defined by the thyroid cartilage, and then dilate the opening with the handle of the scalpel or with your finger.
Fig. 6.2
Insert a tracheal hook and lift the thyroid cartilage cephalad and anterior.
Fig. 6.3
Insert the airway.
Complications
The worst complication of a cricothyrotomy is failure to appropriately cannulate the trachea, usually by creating a false tract when attempting to place the airway device. Immediate confirmation of airway position by the use of end-tidal CO2 detection is imperative in order to immediately identify the mal-placed airway.
Bleeding is an inevitable complication to some degree. Practice performing the cricothyrotomy using only tactile input beforehand. It is rare, given the confines of the cricothyroid cartilaginous cage, to encounter hemodynamically significant hemorrhage if the midline and lateral margins of the operative field are defined with a firm “laryngeal handshake.”
Because the cricoid ring is a closed circumferential ring around the airway, prolonged use of a cricothyrotomy may lead to scarring and stenosis at the cricoid level. Cricothyrotomies should be converted to tracheostomies in a controlled environment within 3 days of placement.
Critical Take-Home Points
Be decisive about recognizing the need and proceeding with a cricothyrotomy. The biggest risk is failing to perform it quickly when needed.
Establish control of the larynx and define the midline using a “laryngeal handshake.”
Once the cricothyroid membrane is entered, always have something inserted in the tract to maintain it: the scalpel, your finger, a tracheal hook, etc.
Practice this procedure so you will not hesitate to perform it when required.
Practice performing this procedure using only tactile input, as visual references will rapidly disappear with even minimal incision bleeding in the trauma bay.
Tube Thoracostomy
Intro
After ensuring an adequate airway, correction of hemodynamic compromise, inadequate oxygenation, or inadequate ventilation due to hemothorax or pneumothorax is the most immediately correctable cause of trauma mortality during a primary survey. This is done in the resuscitation bay by means of placement of a tube thoracostomy (TT). TT is the procedure of choice for the initial management of traumatic hemothorax or pneumothorax.
Indications for tube thoracostomy in the trauma patient include clinical suspicion for a tension pneumothorax or massive hemothorax, any identified hemothorax on CXR or CT scan [8], and/or any pneumothorax visualized on CXR. While some debate exists, the current EAST Practice Management Guidelines states, “Occult pneumothorax, those not seen on chest radiograph, may be observed in a stable patient regardless of positive pressure ventilation (Level 3)” [8]. For the acute trauma patient in the resuscitation bay, there are no absolute contraindications to tube thoracostomy. Relative contraindications in the more stable patient include known pleural disease and coagulopathy.
History
While the use of tubes to aspirate empyema goes back as far as Galenus and Celsus in the Roman age [9], the first modern published account of continuous pleural space drainage was published by Dr. F. Cresswell Hewett, A.M.D. in 1876 [10]. Significant reductions in the rate of posttraumatic empyema were shown during the Franco-Prussian War of 1870–1871 using Hewett’s technique when applied to empyema [11] and were widely endorsed as the preferred alternative to open management after the US experience in World War I [9]. This approach was further cemented during World War II, where TT with an underwater seal became the standard of care for simple traumatic hemothorax and pneumothorax.
Technique
Patient Prep and Positioning
If possible, place the patient in a lateral recumbent position with the arm extended over their head. If this is not safe, placing the ipsilateral arm as far over the patient’s head as possible will help expand the lateral chest wall and define anatomic landmarks, as well as provide a reasonable degree of exposure. Unless the patient is in extremis, the time should be taken to thoroughly prep widely around the site of insertion and place a maximal sterile barrier drape.
Make sure all requisite equipment is in place, including the following: the chest tube; two large clamps, one for occluding the chest tube and the other for guiding the tip of the tube during placement; a large pair of Kelly forceps for bluntly dissecting through the intercostals and parietal pleura; suture for securing the chest tube; and water-seal or equivalent suction apparatus setup and ready for use.
Related posts:


Stay updated, free articles. Join our Telegram channel

Full access? Get Clinical Tree


