FIGURE 35.1 Site for generous injection of local anesthetic prior to chest tube insertion, usually at the fourth intercostal space, above the rib margin, at midaxillary line.
If available, and time permitting, dynamic or static sonographic guidance is recommended to identify the ideal insertion location as well as assess the thickness of the chest wall. This can allow for optimal placement of the thoracostomy tube for hemothorax evacuation (more posterior and caudal) and guide needle depth (14,15).
Securing the chest tube is a very important part of the procedure. The tube is tied to the skin with a 0 nonabsorbable suture. A separate suture should be placed as a purse-string around the tube and left untied. This suture will serve to close the incision once the chest tube is removed. The tube should also be taped to the skin. Extra precautions should be taken to have the chest tube and its connection to the drainage bottles secured to avoid inadvertent partial or complete removal. Usually, 20 cm H2O negative suction is applied at least for the first 48 hours although there is no evidence that this shortens the period of placement or decreases the rate of residual pneumothorax compared to water seal.

FIGURE 35.2 A guidewire is inserted through the sheath into the pleural space, guiding sequential enlargement of the tract by tapered dilators.

FIGURE 35.3 A sturdy clamp is necessary to spread the muscles wide to allow easy insertion of the chest tube.
Open Thoracostomy
The site of placement is marked as above. A 4-cm incision is made parallel to the ribs. Blunt dissection follows through the subcutaneous tissue and muscle. The clamp is finally inserted into the pleural space in a controlled way over the rib underlying the skin incision (Fig. 35.3). It is then opened wide to spread the muscles and enlarge the tract. This is an important step since the novice tends to make the skin incision large but the intermuscular tract too small, resulting in difficulty with tube insertion. There is no reason to “tunnel” the track to the rib above the skin incision. Tunneling causes more pain, makes the procedure more difficult, and offers no benefit.
A finger is inserted to explore for the presence of adhesions at the site of insertion (Fig. 35.4). Then, the chest tube is guided by a clamp into the opening and toward the superior and posterior hemithorax (Fig. 35.5). The clamp is removed, and the tube is secured as discussed above.
Removal of Chest Tubes
Removal takes place when there is no air leak and fluid output is less than 2 mL/kg per 24 hours. The patient is asked to inspire maximally and hold the breath or perform a Valsalva maneuver. With one hand against the chest wall, the physician briskly pulls the chest tube with the other hand and immediately ties the purse string to seal the insertion site. The site is dressed. If a purse-string suture is absent, it is important to apply occlusive dressing to prevent air entry into the chest.
Pitfalls and Complications
A misplaced chest tube may not drain adequately. Do not assume that air or fluid will be drained because a chest tube is in place (16). Confirm correct placement with a chest radiograph, and have a low threshold to replace or add a chest tube if the symptoms are not relieved, hemodynamic instability persists, or drain output ceases abruptly. A chest tube may cause more harm than benefit if inserted improperly. Injury to the intercostals vessels or lung may cause significant bleeding. The chest tube should then be removed and on rare occasions, the bleeding site explored if the hemorrhage continues. Intraparenchymal placement (diagnosed by computed tomography) may cause a persistent air leak. The tube should be removed and a replacement inserted. The leak usually seals spontaneously. The chest tubes should be securely tied and taped to the skin and checked daily. Accidental removal of a tube equals a sloppy technique. Infection is the most common related complication. Poor aseptic technique, long duration of the tube in the chest, and no antibiotic prophylaxis (one dose before tube placement) are associated with this complication (9). Significant undrained hemothorax (estimated at more than 400 mL) should be managed by thoracoscopic evacuation or intrathoracic thrombolysis (17,18).

FIGURE 35.4 A finger is inserted into the track prior to tube insertion to ensure a clear pleural space and absence of adhesions.

FIGURE 35.5 The final position of the chest tube.
DIAGNOSTIC PERITONEAL ASPIRATION (DPA) AND LAVAGE (DPL)
Indications
The most common reason for a DPA/DPL is for the diagnosis or exclusion of intra-abdominal injury. A count of more than 100,000 red blood cells/mm3 or 500 white blood cells/mm3 or the presence of bile, enteric content, or high-amylase fluid in the effluent of the lavage are considered indications for an operation following abdominal trauma (19). However, these criteria are oversensitive and frequently lead to nontherapeutic operations. Furthermore, these cell counts are valid for blunt but not for penetrating trauma. Portable ultrasonography and the liberal use of helical computed tomography have limited the usefulness of DPL. Currently, DPA/DPL is used only on rare occasions due to lack of appropriate technologic resources or due to major physiologic instability that precludes patient transport to computed tomography (20). Another indication for DPL may be to detect bowel injury in patients with an unreliable abdominal physical examination, since CT scan may miss intestinal infarction and perforation. Aspiration or paracentesis of the abdomen is also performed to diagnose and treat ascites.
Technique
Percutaneous Insertion of Peritoneal Catheter
A 0.5-cm skin incision is placed under the umbilicus (or over it in the presence of pregnancy, pelvic hematoma, or a lower midline operative scar). A sheathed needle is introduced with direction toward the pelvis. The needle is connected to a fluid-filled syringe and advanced slowly. When the flow of fluid becomes unobstructed, the needle is in the peritoneal cavity (Fig. 35.6). Needle and syringe are withdrawn, and the plastic sheath is left in place. A guidewire is introduced through the sheath, which is then removed (Fig. 35.7). A dilator is placed over the guidewire and withdrawn. Then, the DPL catheter is introduced and the guidewire is removed (Fig. 35.8). Aspiration is performed first (DPA) and is considered positive if 10 mL of gross blood is aspirated. If the DPA is negative, 1 L of normal saline is infused (DPL). By lowering the normal saline bag below the level of the body, the lavage fluid returns into the bag; the fluid is sent for analysis. It is not necessary to recover the entire 1 L.
A simpler DPL system includes only a catheter fed over a trocar. The trocar and catheter are introduced in a controlled and slow fashion into the abdomen. Two points of resistance are felt as the trocar passes through the anterior fascia and the peritoneum. As soon as the tip of the trocar passes the second point of resistance—and is presumably into the abdomen—the catheter is fed over it toward the pelvis and the trocar is removed. Experience is needed to perform this technique to prevent trocar injury of abdominal contents.

FIGURE 35.6 Site for peritoneal lavage catheter placement, just below the umbilicus.

FIGURE 35.7 The needle is removed, and the remaining plastic sheath allows guidewire insertion.

FIGURE 35.8 A peritoneal lavage catheter is placed over the guidewire.

FIGURE 35.9 Open technique for peritoneal lavage catheter insertion with direct visualization and incision of the abdominal fascia.
Open Technique for Peritoneal Catheter Insertion
A 2- to 4-cm skin incision is performed under or over the umbilicus. The fascia is visualized and retracted. The fascia is then incised and the peritoneal cavity entered (Fig. 35.9). Under direct observation a DPL catheter is introduced toward the pelvis (Fig. 35.10). Sometimes sutures are placed in the fascia to close the perforation. Although theoretically safer, the open technique does not offer any advantage over the percutaneous technique. It takes longer to perform and may potentially be complicated in obese patients. I recommend the percutaneous technique routinely, although the choice of technique is based on operator preference.

FIGURE 35.10 Insertion of the peritoneal lavage catheter under direct vision.
Pitfalls and Complications
The introduction of needles and catheters in the abdominal cavity carries the (very low) risk of injuring the bowel or vessels. The procedure needs to be performed by physicians experienced with the procedure, as the procedure is not frequently performed (21). Once-useful cell counts need to be viewed with caution, as the indications for surgical exploration after abdominal trauma have changed and many injuries are managed nonoperatively. Infusing the lavage fluid but being unable to retrieve it is not uncommon. Slight reposition of the catheter may help.
CRICOTHYROIDOTOMY
Indications
Cricothyroidotomy is a true emergency and should be reserved for those patients who cannot be intubated orally or nasally or have lost a pre-existing oral airway and are unable to be oxygenated or ventilated. Because the cricothyroid membrane is superficial in relation to the skin, it should be selected as the easiest point—even if suboptimal—for the most timely insertion of a life-saving airway.
Technique
Open Cricothyroidotomy
A vertical incision is made directly overlying cricothyroid membrane (Fig. 35.11). This incision is preferred over a horizontal or collar-type incision because it can be extended over the trachea and decreases the likelihood of bleeding from injury to the anterior jugular veins, which run close to the midline of the neck. After sharp incision of any soft tissue between the skin and cricoid cartilage, the cricothyroid space is identified by palpation (Fig. 35.12). Any bleeding at this point is ignored, as the immediate goal is to establish an airway as soon as possible. A pointed clamp is introduced through the cricothyroid membrane and opened to dilate the space (Fig. 35.13). Experienced surgeons may choose to use a scalpel to incise the membrane, though this may risk injuring the cartilage or posterior wall. The thyroid cartilage is retracted upward and anteriorly with a tracheostomy hook. The tracheostomy hook is essential for this procedure. A no. 4 tracheostomy tube is introduced; if a tracheostomy tube is unavailable, a size 6 endotracheal tube may be inserted instead. The bleeding is controlled by sutures, electrocoagulation, or pressure.
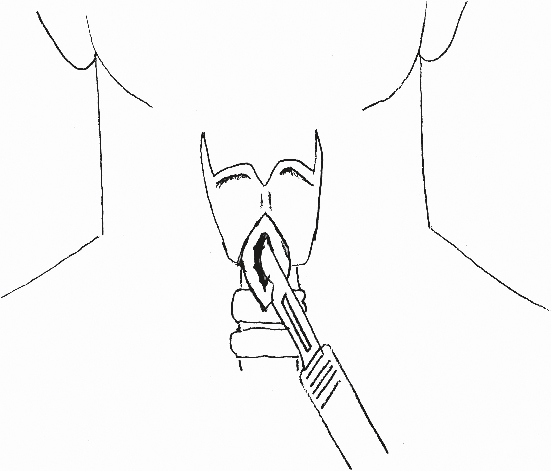
FIGURE 35.11 Vertical incision at the cricothyroid space.
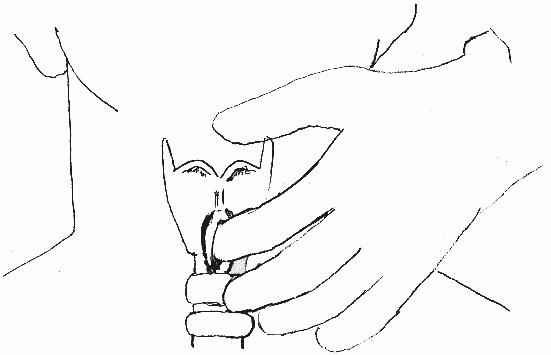
FIGURE 35.12 Digital identification of the cricothyroid space.

FIGURE 35.13 Dilatation of the cricothyroid membrane and insertion of the tracheostomy tube.

FIGURE 35.14 A: Access site for cricothyroidotomy (lateral view). B: Localization of the cricothyroid space and placement of catheter (lateral view). C: Insertion of guidewire through the hollow catheter (lateral view). (From Cook Medical, Inc., with permission.)
Percutaneous Cricothyroidotomy
A vertical incision is made. A hollow needle is introduced through the cricothyroid space (Fig. 35.14A ,B) and a guidewire is introduced through the needle (Fig. 35.14C), which is then removed. Dilation of the trachea takes place over the guidewire by introducing a dilator (Fig. 35.15A). Finally, a no. 4 tracheostomy tube is placed over a guiding dilator and the guidewire (Fig. 35.15B). The dilator and guidewire are removed, and the tube is left in place and secured to the skin.
Pitfalls and Complications
Despite the apparent simplicity of the technique, a cricothyroidotomy can become a challenging procedure, as the pressure to establish an airway in a dying patient is immense. Blood can obscure the field, creating additional difficulty. Incorrect identification of the cricothyroid space and placement of the incision above the thyroid cartilage is possible (22). Inadequate opening of the cricothyroid membrane and loss of valuable minutes while trying to insert the tracheostomy tube through a very narrow opening is again not uncommon. Injury to the thyroid and cricoid cartilage, vocal cords, or posterior tracheal wall and esophagus is additional intra-operative complications. The unfortunate combination of a procedure requiring the most experienced person and the lack of time to have such a person present will unavoidably be the cause for complications (23).
There is controversy about the need to convert the cricothyroidotomy to a tracheostomy at a later stage. Previous standard teaching recommended that a tracheostomy should be performed because cricothyroidotomy is associated with a higher degree of tracheal stenosis if left in place for a long time. However, more recent studies have repeatedly refuted this and find no need for incising the trachea twice (24–26). Our personal practice is to leave cricothyroidotomies in place for as long as they are needed to ventilate the patient without converting to a tracheostomy.
PERCUTANEOUS TRACHEOSTOMY
Indications
A tracheostomy is performed in patients who cannot be safely extubated or have failed extubation. Decrease in airway resistance and improved pulmonary toilet are considered major advantages of tracheostomy over orotracheal intubation. An added advantage is the removal of tubes from the patient’s mouth, allowing better oral hygiene and the ability to speak through fenestrated tracheostomy tubes. The technique for open tracheostomy will not be described because it is a procedure that should be performed strictly by surgeons and preferably in the operating room. The percutaneous technique is safe, easy to teach, and can be routinely performed at the bedside (27,28).

FIGURE 35.15 A: Dilatation of the tract (lateral view). (From Cook Medical, Inc., with permission.) B: Placement of the tracheostomy tube in the cricothyroid space (lateral view). (From Cook Medical, Inc., with permission.)
Related posts:


Stay updated, free articles. Join our Telegram channel

Full access? Get Clinical Tree


