Chapter Eight Full body massage
Chapter contents
Introduction
The protocol described in this chapter is used as a foundation for using massage to address pain. Any of the various positions and method applications found throughout the textbook can be incorporated into the massage. Do not be limited by the illustrations in the sequence.
The following protocol is a comprehensive sequential approach that is suggested as a basis of massage. It does not need to be performed in this exact manner and once learned will almost always need to be altered for each individual client.
General protocol
• Skin, superficial fascia, and edema
• Deeper fascial structures, muscle layers, circulation, and edema
• Tissue density, ground substance, and fluid
• Joint end feel and intrinsic joint play
• Firing patterns (muscle activation sequences)
Face and head
Procedures for the face
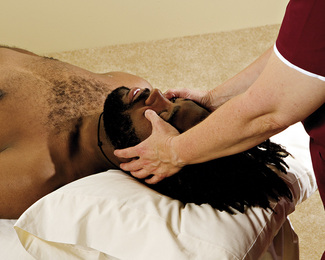
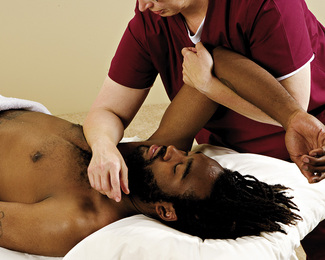
The direction of the lymphatic stroking should be toward the neck and have sufficient drag to gently pull the skin. Address this area with the client in the supine or sidelying position (Fig. 8.1).
• Lightly and systematically, stroke the face to assess for temperature changes, tissue texture, and areas of dampness. If there are identified areas, note them for further investigation.
• Use light compression to assess for bogginess or swelling. If an increase in interstitial fluid is suspected, use lymphatic drain techniques to assist in fluid flow. If in doubt, assume that there is fluid stagnation and perform the methods. (Remember when moving fluid, you cannot push a river. Moving fluid is deliberate work.)
• As mentioned previously, the direction of the lymphatic stroking should be toward the neck and have sufficient drag to gently pull the skin.
• When the area is drained, remassage in the direction of the smile.
• Continuing with the face, carefully move the skin to identify any areas of bind in the superficial connective tissue. Be aware of any bind areas that correspond to the areas identified by the light stroking. Pay particular attention to any areas containing scars, as connective tissue bind is common in areas of scar tissue. Be aware that the soft tissues of the neck weave directly and indirectly into the soft tissues of the head and face. When palpating the soft tissue of the face, observe for tissue movement or bind in adjacent areas.
• Areas of bind can be addressed by slowly moving the tissue into ease, which is the way it most wants to go. Multiple load directions can be used. For example, if the skin and superficial fascia want to move up and to the right between the eyebrows, then that would be the direction of the forces introduced. Hold the tissue at ease for up to 30 seconds and reassess. Subtle changes in the lines of force serve to load and unload the tissue, resulting in hysteresis. Usually the area will improve in pliability.
• Next, address the muscle structures. The facial muscles are only one or two layers deep; therefore, light to moderate compressive force is adequate.
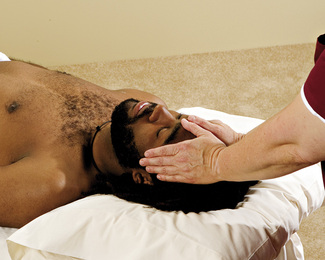
• If muscle tone has increased from sustained isometric contraction, use direct pressure to inhibit the spindle cells and the Golgi tendons. This pressure is applied in a broad based compression with sufficient intensity to elicit tenderness or reproduce the symptoms, but not so intense that a muscle tenses or breathing changes occur (Fig. 8.2).
• Muscle energy methods can be used in combination with the compression by having the client contract the muscle against the pressure applied by the hand. It may take a few experimental contractions before the right muscle pattern is discovered. When the correct muscle contracts, the area will tense or seem as if it is pushing against the massage therapist’s pressure. Pulsed muscle energy, where a repeated contract–relax, contract–relax pattern is used, is especially effective for the facial muscles.
• Positional release is possible by using eye positions until the pain is reduced in the compressed area.
• Apply pressure to the painful area until the client can feel the tenderness or the reproduced symptoms. Maintain the pressure while the client slowly moves the eyes in different positions until pain, tenderness, or symptom sensation is reduced. When the tone begins to reduce, a bending or tension force can then be applied to the muscle fibers.
• To finish the face, return to the initial light stroking to reassess for temperature changes etc. There should be a normalization of areas that were hot, cold, damp, rough, or binding.
Procedures for the head
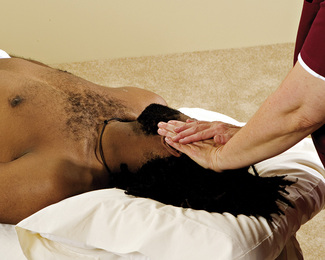
It is important that the scalp moves freely in all directions on the skull to reduce pressure on muscle, nerves, and vessels. Address this area with the client in the prone, supine, and sidelying positions (Fig. 8.3).
• Place the hands on either side of the head by the ears. Turning the head to the side facilitates pressure application. Move the scalp in various directions to assess for bind.
• If an area binds, it can be addressed by slowly moving the tissue into ease, dragging it the way it most wants to go. Multiple load directions can be used.
• Next, move tissues into bind and repeat back and forth to increase pliability.
• If muscle tone has increased in any muscles of the head from sustained isometric contraction use broad based direct pressure to inhibit the spindle cells and the Golgi tendons.
• Apply pressure using broad based compression with sufficient intensity to elicit tenderness or reproduce the symptoms, but not so intense that any muscle tensing or breathing changes occur.
• Muscle energy methods can be used in combination with the compression by having the client contract against the pressure applied by the hand or forearm. It may take a few experimental contractions before the right muscle pattern is discovered.
• Some clients enjoy having their hair gently pulled. The hair can be used as a handle to pull the scalp away from the skull. Make sure that a large bunch of hair is grasped, a gentle pull introduced to bind is held, and is then released. Systematically done, this application addresses the entire scalp.
• Compression to the sides of the head and to the front and back of the head, coupled with a scratching motion to the scalp, can be very pleasant.
Neck
The neck is involved in many reflex patterns, including the tonic neck reflex. The muscles that insert on the ribs often become short with upper chest breathing patterns. The outcome of this may be chronic overbreathing and breathing pattern syndrome symptoms.
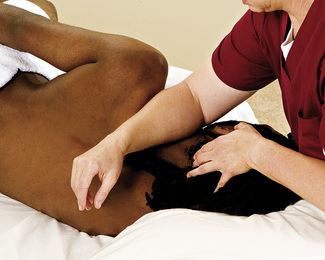
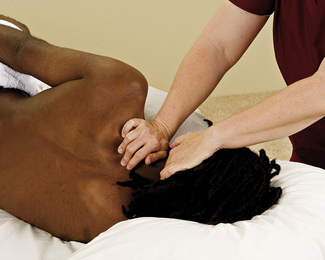
Address this area with the client prone and in a sidelying position (Fig. 8.4).
• Systematically, lightly stroke the area to assess for temperature changes, skin texture, and damp areas. Observe for skin reddening (histamine response) and gooseflesh (pilomotor). These signs indicate possible changes in skin pliability and accumulation of interstitial fluid, as indicated by boggy or edematous tissue and/or increased skin pressure (like a water balloon).
• If increased fluid pressure is evident, drain the area using a combination of light pressure to drag the skin and deeper, rhythmic, broad based compression and kneading to stimulate the deeper vessels.
• Begin with lighter pressure directed toward the collar bone, covering the entire area. Then introduce pumping broad based compression combined with active and passive movement by having the client slowly rotate the head in circles first one way and then the other.
• Next, address the superficial fascia by assessing for tissue bind, always observing for involvement in adjacent areas such as the upper back, chest, head, and face.
• Address areas of bind, slowly moving the tissue into ease, dragging it the way it most wants to go. Multiple load directions can be used.
• Bending force can also be introduced.
• By lifting the tissue much in the way that a mother cat would carry or lift a kitten by the neck, maintain the drag on the tissue until the thixotropic nature of the ground substance is affected and becomes more pliable. Subtle changes in the lines of force serve to load and unload the tissue resulting in hysteresis.
• Work slowly and deliberately, interspersing lymphatic drain type stroking every minute or so. The posterior tissue is very thick, and work in this area can be relatively aggressive, whereas the anterior tissue between the chin and hyoid is more delicate, and gentler methods need to be used in this area.
The musculature in the posterior region needs to be addressed in layers, systematically moving from superficial to deep. Depending on the size of the neck, the depth to the suboccipitals can be more than 2 in (Fig. 8.5).
• The upper trapezius area can be grasped, lifted, kneaded, and shaken, all of which will influence the fluid, connective tissue, and neuromuscular elements. Work the upper trapezius tissue all the way to the proximal attachments at the head.
• Use a wave-like motion over the area to assess for the sliding. If the tissues are adhered, reintroduce connective tissue methods by grasping the surface layer, lifting it off the underlying tissue and systematically shearing the tissue until it is freed from the underlying area. If the area is very adhered, it may take many sessions before the layers separate sufficiently to allow proper muscle action. Work for up to 3 min on an area or until it gets warm.
• Maintaining a broad based contact, increase the compressive force and contact the next layer of tissue. Again, glide and drag the tissue from proximal attachment to distal attachment and then reverse. Repeat three or four times.
• Because this area is extremely active in proprioceptive functions, muscle energy methods are effective, especially using motion and position of the eyes. Depending on the situation, use varying degrees of intensity. The gentlest method is positional release using the eye position to locate the position of release as follows: Locate the tender point and then, while maintaining pressure on the area, have the client slowly move his/her eyes in circles until the tenderness dissipates.
• Next, if the area is not acutely painful, while maintaining the same pressure contact with the tender area, have the client look hard, moving only the eyes toward the pain. This will initiate a tensing of the muscles. Have the client hold this position for a few seconds and then look in the opposite direction; this will activate opposing antagonist patterns and initiate reciprocal inhibition.
• Have the client hold this position for a few seconds and then slowly turn the head in the direction of the eyes, as far as possible from the pain. When the end of range is reached, apply a small overpressure to lengthen the muscles. After a few seconds, apply a bit more tension to the bind and stretch the connective tissue.
• The most aggressive muscle energy pattern used in this area involves appropriate facilitation and inhibition of muscle contraction.
• The client’s head should be in a natural position. The client can be in the supine, prone, sidelying, or seated position.
• Place hands on either side of the client’s head just above the ears and stabilize the head. Instruct the client to push against one of your hands and look hard in that direction. Apply sufficient resistance so that the contraction remains isometric.
• Next, have the client continue to push but to turn only the eyes in the opposite direction to inhibit the contracting muscles. Apply a slightly increased pressure to determine if the area is inhibited. The client should not be able to hold against the increased pressure unless using other muscles or holding the breath.
• If the area does not inhibit, apply sufficient overpressure to move the head 1 in. Slowly let go and repeat until the area inhibits easily.
• If a change is not noted in two or three attempts, it is likely that the problem is more global and connected to some other reflex or proprioceptive pattern. Leave it alone.
• Repeat on the other side. This series of moves can substantially reduce the sensation of tightness in the neck, especially the need to ‘crack’ the neck.
• Gentle rocking rhythmic ranges of motion of the area (oscillation) may be used to continue to relax the area. The more global muscles can be remassaged gently or lymphatic drain massage can complete the procedure.
Anterior torso
Three major cross sections of tissue in the transverse plane define this area. First, the muscles of the neck overlap with the muscles of the upper thorax and the back of the neck and torso, to form the thoracic diaphragm. Second, the diaphragm muscle itself separates the upper and lower torso, and third, the pelvic floor is closed by the crisscross design of the pelvic floor muscles. These transverse layers of tissue are involved in stability and respiration.
Procedures for the anterior torso
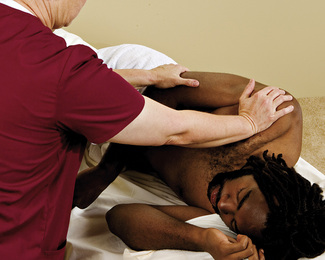
Massage begins with superficial work, progresses to deeper tissue layers, and then finishes off with superficial work. Initial applications are palpation assessment to identify temperature and superficial tissue changes. This area can be massaged while the client is sidelying or supine. A combination of both is most desirable (Figs 8.6 – 8.7).
• Systematically lightly stroke the area to assess for temperature changes, skin texture, and damp areas. Observe for skin reddening (histamine response) and gooseflesh (pilomotor). These signs indicate possible changes in connective tissue, muscle tone, or circulation patterns.
• Increase the pressure slightly and assess for superficial fascial bind, changes in skin pliability, and accumulation of interstitial fluid, as indicated by boggy or edematous tissue and/or increased skin pressure (like a water balloon.)
• If increased fluid pressure is evident, drain the area using a combination of light pressure to drag the skin and deeper, rhythmic, broad based compression and kneading to stimulate the deeper vessels.
• Begin with lighter pressure in the direction of the axilla while working above the waist, or toward the groin while working below the waist, covering the entire area. Then introduce pumping broad based compression, which can be combined with active and passive movement of the area.
• Next, address the superficial fascia by assessing for tissue bind, observing for adjacent areas involved, such as the tissue leading into the shoulder and pelvic girdles.
• Move the skin to identify any areas of bind in the superficial connective tissue. Notice whether any bind areas correspond to the areas of skin reddening or gooseflesh identified by the light stroking. Pay particular attention to any scars, because connective tissue bind is common at these sites.
• Treat areas of superficial fascial bind with myofascial release methods. Address these areas by slowly moving the tissue into ease, dragging it the way it most wants to go.
• Multiple load directions can be used. For example, if the skin and superficial fascia want to move up and to the right at the sternum, then that would be the direction of the forces introduced. Hold the tissue in ease position until release is felt, or for up to 30 seconds.
• Use a slow, sustained drag on the binding tissues, with the lines of tension being introduced at each end of the binding tissue.
• Place your forearm or flat hand (finger pads if the hand is too large) at one end of the bind and the other forearm and hand at the other end of the bind.
• Contact the tissue gently but firmly, pressing only as deep as the superficial fascial layer, and separate the forearms or hands, creating a tension force into the binding tissue.
• The musculature in the anterior thorax is addressed in layers, systematically, moving from superficial to deep. It is important to make sure that muscle layers are not adhered to each other. The most common occurrence is pectoralis major stuck to pectoralis minor. One muscle layer should be sheared off the next deeper layer. It is helpful to place the client so that the surface layer is in a slack position by positioning the attachments of the muscle close together and bolstering the clients so that he/she can remain relaxed.
• Because the fascia in the chest covers the pectoralis major, which extends into the arm, the arm can be used to increase or release the tension force on the tissue.
• Use gliding with a compressive element, beginning at the shoulder, and work from the distal attachment of the pectoralis major at the arm toward the sternum, following the fiber direction. This can be done in a supine or sidelying position with the client rolled. Repeat three or four times, each time increasing the drag and moving slower.
• Any areas that redden may be housing trigger point activity. Because latent trigger points can cause muscles to fire out of sequence, it is important to restore as much normalcy to the tissue as possible.
• To increase circulation to the area and shift neuroresponses of latent trigger points, move the skin over the point into multiple directions of ease, and hold the ease position for up to 30 seconds.
• If this does not relieve the tenderness, positional release is the next option, followed by muscle energy methods, if necessary. Local lengthening of the tissue containing the trigger points is effective, and authorities have found that it is needed to complete the release of trigger points. Local lengthening is accomplished by using tension, bending, or torsion force on the tissue with the trigger point and taut band.
• Use compression with gliding deep enough to address this layer of tissue.
• Broaden the base of contact so that the surface tissue does not tighten to guard against poking.
• Glide in various directions, both with and against the grain of the muscle fibers.
• Repeat three or four times, with each application slower and at a slightly different angle to access the multiple fiber directions of these muscles.
• Next, knead slowly across the fiber direction, using enough pressure and lift to ensure that you are affecting muscle fiber in this layer. The methods address both connective tissue and neuromuscular elements of the muscle.
• Repeat three or four times, increasing the depth and drag each time and being aware of the muscle moving with the application. Work the entire length of the area, and repeat.
• Narrow the focus to address the third tissue layer to include the intercostals. Make sure the surface muscles slide over these muscles. This is commonly a ticklish area, so do not use a hesitant touch.
• Glide and drag the tissue using the fingers. These are not long moves since the span of these muscles is between ribs.
• Tender points are treated with positional release. Many times the position of release can be reached by different compressive forces on the ribs to change the shape of the rib cage.
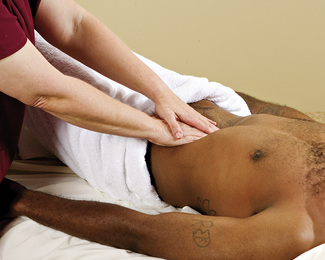
The abdominal organs can be rolled to encourage peristalsis. Specific massage to the large intestine can support normal bowel elimination. To complete the area, rhythmic compression of the entire anterior torso area can be used. This stimulates lymphatic flow and supports breathing function (Fig. 8.8).
