FRACTURES AND DISLOCATIONS
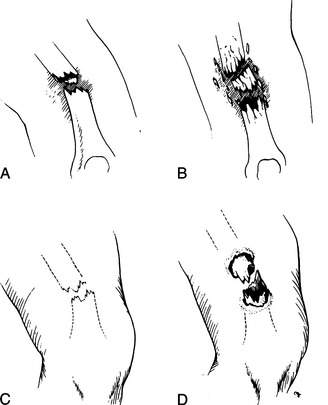
A bone fracture (break) may be simple (one clean break) or comminuted (multiple breaks or shattered) (Figure 38). Furthermore, it may be closed (skin intact) or open (“compound,” with the skin broken, often with the bone visible in the wound). An open fracture is highly prone to infection. A fracture may be associated with injuries to adjacent nerves and blood vessels.
A broken bone or dislocation (displacement of a bone at the joint) should be suspected whenever there has been sufficient force to cause such an injury, if a snap or crack was heard, if the victim cannot move or bear weight on the body part, or if an injured body part is painful, swollen, discolored, or deformed. A broken or dislocated bone should be compared with the normal opposite limb; asymmetry is a key sign of a significant injury. Pain with a broken bone tends to be instantaneous, constant, and worsened considerably with motion, which may also create a grating sensation and noise. A small child with a fracture or dislocation will not use the affected body part and will cry vigorously with the slightest manipulation. If you think that a bone may be broken, it is best to treat it as a break until an x-ray can be obtained or the situation shows obvious marked improvement (which usually requires 4 to 6 days).
Because of the force necessary to break or displace a bone, any person with a fracture or dislocation should be examined carefully for other injuries. All fractures and some dislocations cause a certain amount of bleeding, which can be significant with the larger bones (femur, pelvis). For instance, it is possible to lose 250 to 500 mL of blood at the site of a humerus fracture, 350 to 650 mL from a tibia fracture, and 800 to 1,200 mL from a femur fracture. Be prepared to treat the victim for shock (see page 60). Do not manipulate a broken limb unnecessarily, even if circulation to the limb seems normal; excess motion increases the risk of damage to the bones, nerves, and blood vessels. When examining an injury, always begin with an uninjured area and work toward the injury, so that the victim’s response to pain doesn’t interfere with your exam.
If the skin has been disrupted in the vicinity of the broken bone, the fracture is open. The bone end may or may not be visible through the wound, and bleeding may be minor or major. If a victim has sustained an open fracture, is alert enough to swallow liquids, and is more than 6 hours distant from a medical facility, administer penicillin, erythromycin, amoxicillin, or cephalexin 500 mg by mouth every 4 hours. Rinse the wound gently to remove any obvious dirt, and then cover it with a sterile dressing. Do not vigorously scrub or irrigate the wound. Unless there are signs of loss of circulation (coldness, blue color or paleness, numbness) or it is necessary to realign the limb to allow splinting and evacuation, do not try to reposition the injury or to push the bone back under the skin. If you must manipulate the limb, rinse any visible bone with water or disinfectant (such as povidone iodine 10% solution), and then allow the bone to slide under the skin without touching it. While holding traction (pulling on the end portion of a limb in a longitudinal axis to achieve correct anatomic alignment), immediately apply a splint (see page 74) to prevent further motion and damage.
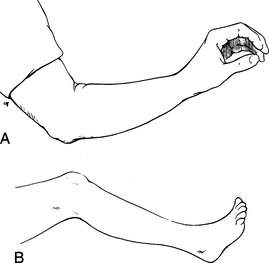
In general, it is unwise to manipulate an injured limb. If the extremity is deformed, but the circulation is intact (normal pulses, sensation, temperature, and color), do not attempt to straighten it; instead, splint it in the position in which you found it (“splint ‘em as they lie”). On the other hand, if the circulation to an extremity is obviously absent (the extremity is numb, cold, and blue or pale), if the victim is in extreme discomfort, or if gross deformity prevents moving the victim out of a dangerous situation or prevents the application of a splint, then an attempt to restore the part to a normal position is justified. Early realignment is easier than delayed realignment, may alleviate a major amount of pain, helps control blood loss into the surrounding soft tissues, may decrease the incidence of fat emboli (fat from the bone marrow entering the bloodstream and causing severe illness), and often allows easier splinting and transport. Be advised, however, that the relocation of a fracture or dislocation may be difficult and transiently very painful for the victim. If you are going to make an attempt to realign a limb, it should be done as soon as possible after the injury (preferably, within 3 hours), before swelling and increasing pain and muscle spasm make the maneuver impossible. If there is no deformity, splint the injured body part in the “position of function” (the position it would assume if it were at rest) (Figure 39).
COMPARTMENT SYNDROME
Within the limbs (legs, arms, forearms, feet, hands, and fingers), there are “compartments” defined by inelastic boundaries of tough connective tissue, or fascia. These compartments contain bones, groups of muscles, blood vessels, and nerves. If swelling occurs within a compartment—typically caused by bleeding, continuous excessive external pressure, or a crush injury—the pressure can exceed 30 mm of mercury, which is the pressure at which blood travels through microscopic blood vessels, such as capillaries. This effectively squeezes the tiniest blood vessels and occludes flow through them, cutting off circulation to the compartment and rapidly causing tissue death. The most common cause of compartment syndrome in a wilderness enthusiast is swelling surrounding a broken bone or associated with a severe blunt injury, such as occurs after a fall. The lower leg and forearm are the most common sites. Compartment syndrome is rare following snakebite (see page 346), because most of the swelling following a bite is confined to superficial soft tissues.
Signs and symptoms include severe pain that seems out of proportion to the injury. The underlying tissue feels extremely tight, and pain is increased markedly with external pressure. Stretching the muscles that run through the compartment causes worsened pain. There may be decreased sensation or tingling in those skin areas supplied by the nerves that run through the compartment—for example, decreased sensation to pinprick or light touch on the top of the foot in the web space between the great and second toes because of pressure on the deep peroneal nerve, which runs through the anterior leg compartment. The limb may become pale or show a bluish tinge. When pulses become diminished or lost, the situation has become severe, and the limb will be weak or become useless (paralyzed).
SPLINTS AND SLINGS
These general guidelines should be followed in the application of splints:
1. Examine every suspected fracture to see if it is open or closed (see page 70). Check the circulation below the fracture site by inspecting pulses, skin color, sensation, and movement of fingers and toes. In the arm, check the radial and brachial pulses; in the leg, check the popliteal, dorsalis pedis, and posterior tibial pulses (see Figure 16).
2. Control bleeding (see page 54) and apply a dressing if necessary.
3. Splint the joint above and below the injury. For instance, to keep the knee from moving, you often need to prevent motion at the ankle, knee, and hip. There will be times when this is difficult, but do the best you can.
4. If possible, fashion the splint first on an uninjured body part, and then transfer it to the injured area. This lessens manipulation of the injured part and minimizes pain associated with splinting.
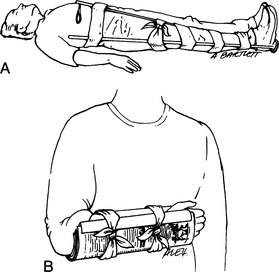
5. Splints can be fashioned from sticks, cardboard, foam pads, rolled newspapers, pack frames, ski poles, or other similar objects (Figure 40). The SAM Splint has become a standard item for the outdoor first aid kit. The core of the SAM Splint is a long rectangle of “O” temper, ultrathin aluminum alloy. The covering layers are made of dermatologically safe closed-pore foam. The splint is available in a standard size of 4 ¼ in by 36 in, which rolls easily to become a 3 in by 4 ¼ in cylinder. It can be shaped to splint a great number of body parts. The splints also comes in a 5½ in wide XL version, in prepackaged lengths of 18 inches and 9 inches, and as a finger splint that measures 3.75 by 1.75 in.
6. When applying a splint, don’t cut off the circulation. Pad all bony prominences, other pressure points, and injuries as best as possible. This may be done with foam, a sleeping pad, pack material, or clothing.
7. If the injury is closed (skin unbroken) and there are no signs of decreased circulation, apply ice packs intermittently to the swollen area. Do not apply ice directly to the skin.
8. Remove all constrictive jewelry (watches, bracelets, rings, and so forth). Left in place, these can become inadvertent tourniquets on swollen limbs and fingers (see page 477).
9. Administer appropriate pain medication.
10. After a splint is applied, check the limb periodically to make certain that swelling inside the splint has not cut off the circulation. This is particularly important in cold weather, where numbness can be a confusing factor.
11. Elevate the injured part as much as possible, to minimize swelling.
12. Insist that all victims seek medical evaluation when they return home, to be certain that all bones are properly aligned and that no further intervention is needed.
To learn more about specific splints and slings, read about the specific injuries (below).
SPECIFIC INJURIES
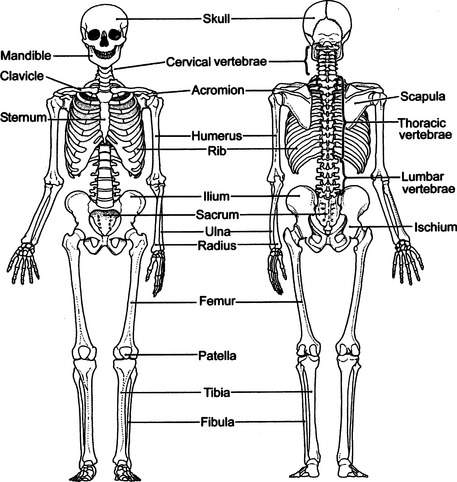
The major bones of the skeleton are illustrated in Figure 41.
Neck
If a fracture of the cervical spine is suspected because of neck pain, weakness or loss of feeling in an arm or leg, tingling in an arm or leg, or mechanism of injury (for instance, a victim who has fallen, is unconscious, and has a face or head injury), you must immediately immobilize the head and neck. This can be done by taping the head to a backboard or stretcher, by applying a rigid collar (which may be fashioned from a SAM Splint, as in Figure 22), or by placing sandbags or their equivalent on either side of the head (see Figure 21). Never move the neck to reposition it.
For the ambulatory, cooperative victim with minor neck discomfort, a thick pad (rolled towel, jacket) can be placed posteriorly at the base of the neck. Secure this by wrapping tape or cloth around the forehead, and then cross it over the pad and bring it back out under the armpits to be tied across the chest (see Figure 23). Alternatively, use a thick removable waistband from a backpack or a rolled Ensolite pad in a horse-collar configuration. Soft-collar techniques should not be relied on to hold the neck immobile; they merely offer gentle support.
If the victim is uncooperative or agitated, hold his head until you can firmly immobilize it and restrain the victim from motion (see Figure 24). All of this is necessary to avoid injury to the spinal cord. If the victim must be moved or turned on his side (most commonly to allow vomiting or to place insulation beneath him), hold his head fixed between your forearms while you hold his shoulders with your hands. In this way the victim can be “logrolled,” using as many rescuers as possible to avoid unnecessary head, neck, and spine motion.
Logrolling the Victim (see Figure 25)
1. The first rescuer approaches the victim from the head, and keeps the head and shoulders in a fixed position so that the neck doesn’t move.
2. The second rescuer extends the victim’s arm (on the side over which the victim is to be rolled) above the victim’s head. The first rescuer uses this arm to help hold the victim’s head in proper position.
3. All rescuers work together to roll the victim without moving the neck.
Skull and Face
See page 61. If there is a fracture of the skull, the victim may demonstrate black eyes (“raccoon eyes”), bruising behind the ears (“Battle’s sign”), or cerebrospinal (clear or watery blood-tinged) fluid leaking from the nose or ears. If there are fractures of bones in the face, there will usually be swelling and pain of the overlying soft tissues. If the swelling is severe around the nose, breathing may be impaired. If the bones around the eye socket are broken, there may be double vision or inability of the affected eye (or eyes) to traverse its full range of motion.
Jaw
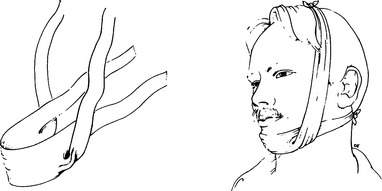
A fractured jaw is usually caused by a fall or a blow from a closed fist. The lower bone (mandible) may be broken in one or more places. The victim will complain of pain, swelling, inability to close his mouth, improper fit of the teeth, perhaps missing or broken teeth, and difficulty talking. If the fracture extends into the oral cavity, there may be bleeding from the mouth. Treatment is to wrap a bandage over the top of the head and under the jaw for support (Figure 42). It should be easily removable in case the victim needs to vomit. A liquid diet should be maintained until the victim can reach the hospital.
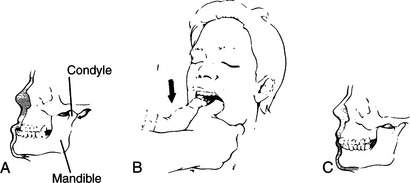
A dislocated jaw can occur from a blow, from a widemouthed yawn, or even during sleep. The mandible slips loose from its two bony sockets below the ears and slides forward (Figure 43). To reposition the mandible, grasp the jaw by placing your thumbs (with cloth or gauze padding for traction) inside the mouth against the lower molars (rear teeth), holding the bone firmly with your remaining fingers. Exert steady pressure straight down until you feel the mandible “pop” back into place, and the victim says his teeth fit properly (Figure 43, B). After the jaw is repositioned, tie a bandage under the chin and over the top of the head to keep the jaw from easily dislocating again (see Figure 42). The bandage should be easily removable in case the victim needs to vomit.
Wrist, Hand, and Finger
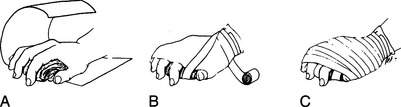
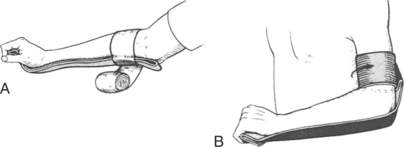
A fracture or dislocation of the hand, wrist, or finger should be positioned and splinted in the normal resting position (position of function; see Figure 39, A). For a wrist or hand injury, this may be accomplished by allowing the victim’s fingers to rest around a padded object in his palm (such as a rolled pair of socks, rolled elastic bandage, or wadded cloth; Figure 44), with a circumferential wrap to maintain position (Figure 45). Every attempt should be made to allow the fingertips to remain uncovered, to assess circulation. If the wrist is involved, place a rigid splint on the underside of the hand, wrist, and forearm to prevent motion (Figure 46). Fingers may be splinted independently or taped together (with padding in between) for support (Figures 47 and 48).
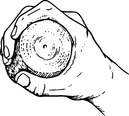
Figure 44 A rolled elastic bandage is gripped gently to maintain the hand in the “position of function.”


Stay updated, free articles. Join our Telegram channel

Full access? Get Clinical Tree


