CHAPTER 138
Fingernail or Toenail Avulsion
Presentation
These injuries may result from a variety of causes: The patient may have had a blow to the nail, such as its being caught in a closing car door; the nail may have been torn away by a fan blade or other piece of machinery; or a long, hard toenail may have been caught on a fixed object and been pulled off of the nail bed. The nail may be completely avulsed, partially held in place by the nail folds, or adhering only to the proximal nail bed (Figures 138-1). On occasion, an exposed nail bed will have a pearly appearance, with minimal bleeding, making it seem as if the nail is still in place when, actually, it has been completely avulsed. See the anatomy of the fingernail in Figure 138-2.
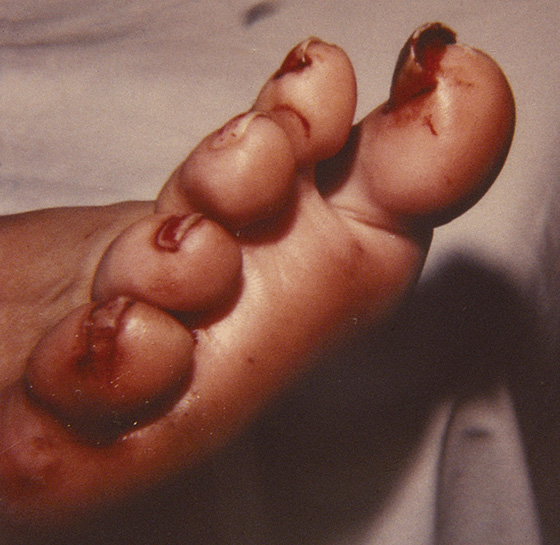
Figure 138-1 Partially avulsed toenail of the great toe.
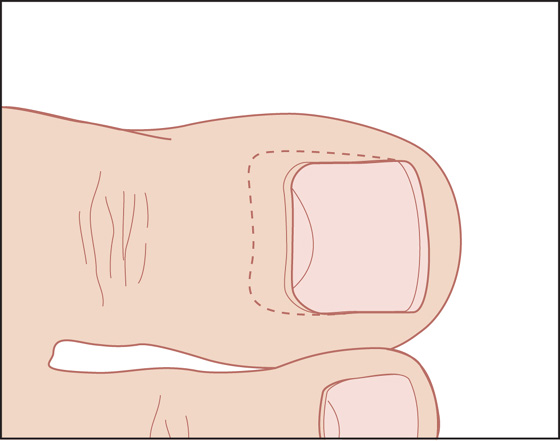
Figure 138-2 Avulsed nail reinserted under the eponychium.
What To Do:
 After taking a standard history, examine the finger for sensory and motor function, giving special attention to a possible avulsion of the extensor tendon (see Chapter 108).
 Obtain radiographs if there was any crushing or high-velocity shearing force involved. Radiographs are otherwise unnecessary.
 Complicated crush injuries, especially where there is severe damage or tissue loss of the germinal matrix, require specialty consultation.
 Perform a digital block (see Appendix B) to anesthetize the entire nail bed.
 Cleanse the nail bed with normal saline, and remove any loose cuticular debris. Whenever possible, salvage the nail or any remaining fragment for replacement over the nail bed. This will provide the most comfortable dressing (with the most accurate anatomic and physiologic match) for the patient.
 If the partially avulsed nail is still tenuously attached, it can be left in place, or, to make it easier to clean, you can remove it by separating it from the nail fold using a straight hemostat and/or fine scissors. Cleanse the nail thoroughly with normal saline, cut away any contaminated portions of the distal free edge of the nail, and remove only loose cuticular debris from the remainder of the nail. Do not excise any of the proximal nail root.
 If bleeding interferes with inspection and wound management, a finger tourniquet can be applied to provide a bloodless field. If a commercial tourniquet is not available for a finger injury, place a tight surgical glove onto the patient’s hand, cut a small opening at the tip of the glove finger, and then roll up the glove finger over the injured digit until it forms a tight band around the base of the finger. Place a hemostat on this tourniquet so that you do not forget to remove it at the end of the procedure.
 Reduce any displaced or angulated fractures of the distal phalanx. If a stable reduction cannot be obtained, consult an orthopedic, hand, or podiatric surgeon for possible pinning.
 Inspect the nail bed for lacerations, and, if large or displaced wounds are present, carefully reapproximate with fine (6-0 or 7-0) absorbable sutures. Small and well-approximated nail bed lacerations need not be primarily repaired (see Chapter 146).
 Reinsert the nail root under the eponychium (Figure 138-3), and apply a fingertip-type dressing (see Appendix C).
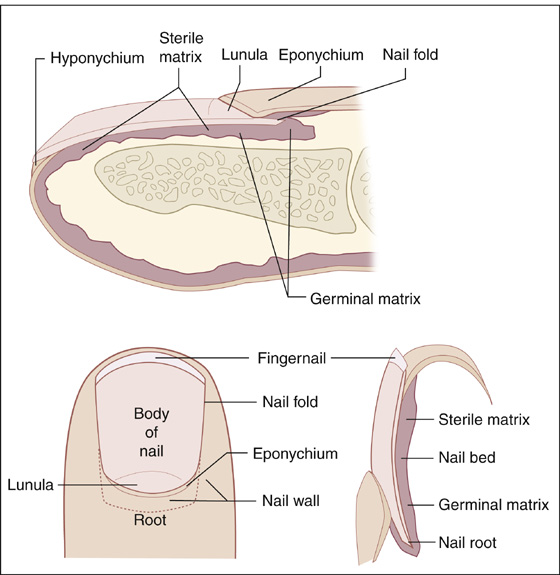
Figure 138-3 Anatomy of the fingernail.
 If the nail does not fit tightly under the eponychium, it can be sutured in place at its base (see Chapter 147) or just held in place with a conforming gauze dressing.
 A loose-fitting nail can also be glued in place using cyanoacrylate topical skin adhesive (Dermabond). Place several drops of tissue adhesive onto a clean, dry nail bed. Insert the clean, dry nail root first under the eponychium. Lower the rest of the nail onto the nail bed and hold it in place using a swab to apply gentle pressure for 1 minute. Apply a simple protective dressing. Do not apply bacitracin or other antibiotic ointment, because this may dissolve the adhesive.
 If the nail is missing, badly damaged, or severely contaminated, replace it with a substitute. An artificial nail can be cut out of the sterile aluminum foil found in a suture pack or can be cut from a sheet of fine-mesh Vaseline gauze. Cut this substitute nail into the shape and size of the original nail, including the nail root, so that it can completely cover the nail bed, including the germinal matrix. Insert this stent under the eponychium in place of the nail and apply a fingertip dressing after it is in place. The aluminum stent can be secured in place using tissue adhesive as previously described.
 Leave the replaced nail or these stents in place until the underlying nail bed hardens and the original nail or stent separates spontaneously.
 If the wound was contaminated, the tissue crushed, or the patient immunocompromised, it is acceptable to prescribe 3 to 4 days of a first-generation cephalosporin as prophylaxis. However, even fractures of the distal phalanx do not usually require antibiotics.
 Provide appropriate tetanus prophylaxis (see Appendix H).
 Along with a soft fingertip dressing, a protective fingertip splint can be applied (see Chapter 111).
 The patient should be given standard wound instructions, and elevation of the injured digit above the level of the heart should be stressed.
 Initially, the dressing should be changed every 3 to 5 days, but the nail (or artificial substitute) should always be left in place.
What Not To Do:
 Do not dress an exposed nail bed (where the nail has not been replaced) with an ordinary gauze dressing or any supposedly nonadherent dressing. These dressings will adhere to the nail bed, require lengthy soaks, and usually will cause an extremely painful removal.
 Do not ignore wide or displaced nail bed lacerations or fractures of the distal phalanx. The new nail can become deformed or ingrown wherever the bed is not smooth and straight. The best method for preserving the original anatomic alignment of the soft tissues is to replace the avulsed nail back into its original position and hold it there.
 Do not débride any portion of the nail bed, sterile matrix, or germinal matrix to help prevent future nail deformity. Severely damaged nail bed tissue will usually survive.
 Do not use nonabsorbable sutures to repair a nail bed. These would be extremely difficult and painful to remove.
 Do not forget to remove any finger tourniquet that had been applied. This may result in ischemic autoamputation.
Discussion
The eponychium is unlikely to scar to the nail bed; however, unless there is infection, inflammation, or considerable tissue damage, separating the eponychium from the nail matrix by reinserting the nail or inserting an artificial stent helps to prevent the development of adhesions and future nail deformities. Proper alignment of all injured nail bed structures is the most important factor in preventing a subsequent deformed nail.
Antibiotic prophylaxis for fingertip injuries has been evaluated in several studies, but there is no data that demonstrates any benefit. Before discharge, patients should be counseled on the importance of monitoring carefully for signs of infection, including worsening pain or redness, purulent drainage, red streaking, and fever.
Minimally traumatized avulsed nails can actually re-adhere and grow normally if carefully replaced in their proper anatomic positions.
A fine mesh Vaseline gauze stent left in the nail sulcus will be pushed out as the new nail grows.
Complete regrowth of an avulsed nail usually requires 4 to 5 months at 1 mm per week.
Related posts:
Stay updated, free articles. Join our Telegram channel

Full access? Get Clinical Tree


