Fig. 27.1
Joel-Cohen and Pfannenstiel incisions
A 10–12 cm curvilinear convex incision 2 cm above the symphysis pubis is made with a scalpel. The subcutaneous tissue is then incised and brought down to the fascia. The fascia is exposed and incised transversely. The incision is extended laterally with heavy curved Mayo scissors. The superior edge of the fascia is grasped with Kocher clamps and elevated. The underlying muscles are separated from the fascia by sharp and blunt dissection. Once the fascia is dissected, the rectus muscles are separated with finger dissection. Any perforating vessel is electrocoagulated or suture ligated. The peritoneum is incised sharply and the incision is extended vertically. The rectus muscles are then pulled manually in a transverse direction to increase exposure [7].
The Joel-Cohen Incision (Fig. 27.1)
A 10–12 cm straight incision is made through the skin 3 cm below the level of the anterior superior iliac spines with the scalpel. The subcutaneous tissues and the fascia are opened only in the midline. Both subcutaneous tissues and the fascial incision are extended transversely by blunt finger traction and the peritoneum is opened. Finger traction is carried out to separate the rectus muscles in the midline and all layers of the abdominal wall are stretched manually to the extent of the skin incision.
A bladder blade is inserted into the abdomen and the vesicouterine peritoneum is identified, and entered sharply with the Metzenbaum scissors. This incision is extended laterally, and a bladder flap is created digitally by blunt dissection (Fig. 27.2). The bladder blade is reinserted [7].
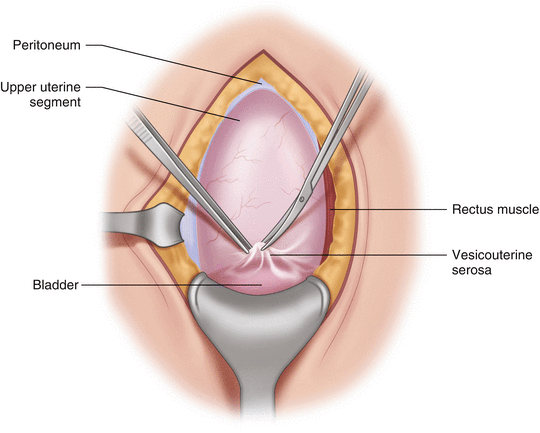

Fig. 27.2
The vesicouterine peritoneum is identified and entered sharply with the Metzenbaum scissors
Uterine Incisions
Transverse Incision
The incision of choice, and therefore the most common incision, is a transverse incision made in the lower uterine segment. The advantages of this incision include greater ease of repair, a location that leads to less chance of rupture with subsequent pregnancies and less chance of bowel or omentum adherence [6]. A 1–2 cm transverse incision is made with a scalpel with a #10 blade approximately 1 cm below the upper margin of the peritoneal reflection in the midline. This should be placed higher in women who have achieved advanced or complete dilatation so as not to inadvertently enter the vagina and to avoid extension to the lateral vessels [4]. Great care should be taken to avoid injury to the fetus with laceration, which is the most common fetal injury seen [5]. The incision is extended with the Bandage scissors (Fig. 27.3a) or manually (Fig. 27.3b) in a lateral and upward fashion.
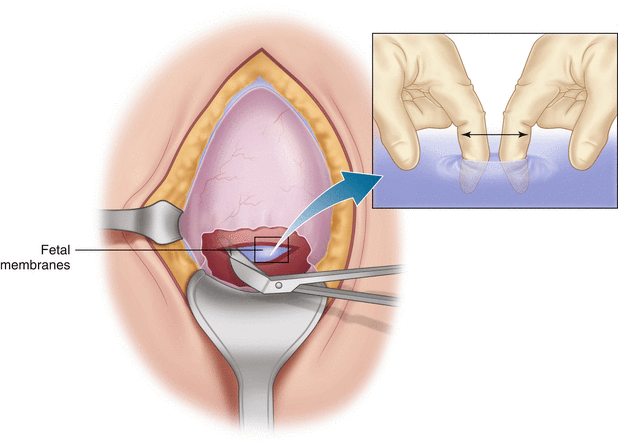

Fig. 27.3
Uterine incision extended with the bandage scissors or manually
Care is taken not to extend the cut into the lateral uterine vessels. It is very important to make the uterine incision large enough to deliver the fetus intact without trauma. If the placenta is encountered, it must be retracted or incised, necessitating rapid delivery of the fetus. If the incision needs to be extended this can be accomplished by extending the lateral edges of the uterine incision upward or by a midline, vertical, inverted “T” incision. The amniotic sac is then ruptured using an Allis clamp.
Vertical Incision
A vertical, or classical, incision is used in certain situations to gain improved access to the uterine cavity, such as in the case of inadequate exposure of the lower segment due to adhesions, myoma or obesity, multiple gestations, or a fetus in a non-vertex presentation, especially if it is large and in a transverse, back-down position. This type of incision may also be necessary for the delivery of a preterm fetus, when the lower segment is not developed enough, thus not wide enough, to accomplish delivery atraumatically through a transverse incision. A vertical uterine incision is carried out by incising the uterus with a scalpel beginning in the lower uterine segment and extending upward using bandage scissors until it is of sufficient length to allow for atraumatic delivery of the fetus.
Fetal Extraction
Cephalic
Delivery of the fetus is accomplished by passing a hand in the uterine cavity between the symphysis pubis and fetal head. The fetal head is then carefully elevated through the incision while the assistant provides mild fundal uterine pressure (Fig. 27.4). If there is difficulty with delivery of the fetal head, consideration of an inadequate incision size at either the skin, fascia, rectus muscles, or uterus should be evaluated and corrected, if necessary. If the incision is assessed to be an adequate size and the head cannot be delivered, application of a vacuum device should be considered. After delivery of the head, the mouth and nares are cleared of amniotic fluid and mucus with a bulb syringe. The remainder of the fetus including shoulders and body are delivered by gentle traction and fundal pressure. The umbilical cord is doubly clamped and cut. The infant is handed off to the awaiting designated attendant who can perform resuscitative efforts if necessary, preferably a pediatrician or someone certified in neonatal resuscitation. Umbilical artery blood gas and blood samples are obtained from the umbilical cord.
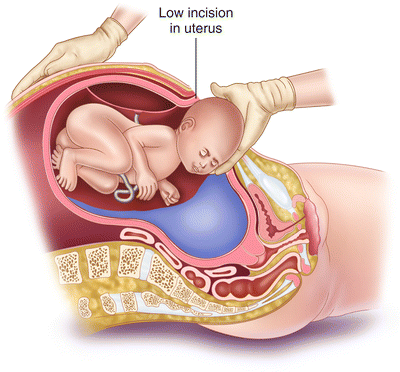

Fig. 27.4
Fetal head is carefully elevated through the incision
Breech
It is very important to make the uterine incision larger prior to attempting to deliver the fetus to minimize unnecessary traction on the after-coming head. The breech fetus may be delivered in frank breech presentation (buttocks presenting with hips flexed and legs extended above the head) (Fig. 27.5a), complete breech presentation (one or both knees are flexed) or footling breech presentation (one or both feet are the lowest presenting part).
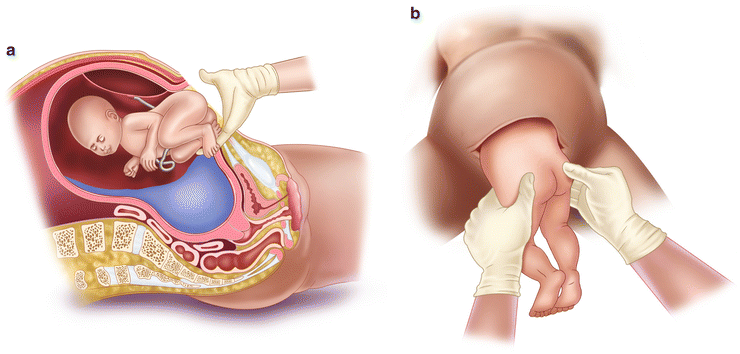

Fig. 27.5
(a) Frank breech presentation. (b) Gentle downward traction on fetal hips
Frank Breech Extraction
At the point of hip flexion, the fetus is grasped with a finger bilaterally and gentle downward traction is placed on the hips (Fig. 27.5b) until the legs are completely delivered and the fetus has been delivered to the level of the scapulas. Both hands are then placed over the bony pelvis and a moist cloth is placed under the body of the fetus to provide support. Each humerus is palpated until the elbow is reached. The humerus is supported and the arm is swept downward without force or traction taking care not to rotate the fetal spine. The head is then delivered gently without pressure from above, taking care to make sure the head remains flexed, preventing neck hyperextension.
Complete or Footling Breech Extraction
Prior to puncture of the amniotic sac, the fetal feet are identified and grasped in one hand. The amniotic sac is ruptured and using gentle downward traction on the fetal legs, the fetus is delivered to the level of the scapulas. The remainder of the delivery is as described above.
Placental Delivery
Immediately after delivery of the fetus, an intravenous infusion of oxytocin 20 U in 1,000 mL of crystalloid solution bolus should be started until adequate uterine tone is achieved, at which time the rate can be decreased. The placenta is removed by gentle massage of the uterine fundus and gentle traction of the umbilical cord. All placental contents including amniotic membranes should be removed which can be accomplished with the use of a Kelly clamp to slowly dissect the amnion from the uterine wall (Fig. 27.6).
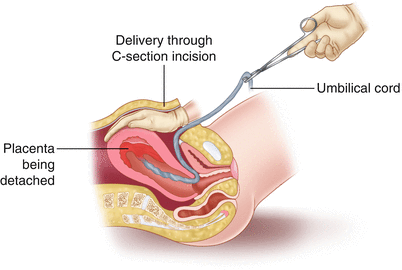

Fig. 27.6
Technique for placenta delivery
Uterine Repair
The placenta is handed off and the uterus is grasped at the fundus and delivered out of the incision and placed on the maternal abdomen. Although some surgeons prefer to repair the uterus in situ, the advantages of exteriorizing the uterus include immediate assessment of uterine tone, increased ease in identifying and repairing bleeding sites and ability to visualize the adnexa for any abnormalities or for performing tubal ligation. The sole disadvantage is potential increase in discomfort to the patient [4]. The uterine fundus is then covered with a moist laparotomy pad. A sweep of the uterine cavity is performed with a dry laparotomy pad in order to ensure complete removal of all clots and possible placental debris. Any brisk bleeding from the uterine incision is clamped with T-clamps (broad based Allis clamps) until the incision is repaired. The uterine incision is closed with a continuous 0 delayed-absorbable suture in a running, locked fashion beginning at one angle of the incision through the full thickness of the myometrium. It is important to identify the uterine vessels and place them between thumb and index finger prior to placement of the needle into the myometrium. A Kelly clamp is placed on the suture end on each angle of the incision as a means to manipulate the uterus. A second imbricating layer of suture of the same material is carried out. Once the needle has been placed it should not be withdrawn to minimize bleeding. There is no evidence to suggest that there is any benefit to closure of the bladder flap. If uterine vessels appear to be lacerated, an O’Leary stitch should be placed promptly to minimize blood loss (described under “Complications”).
Stay updated, free articles. Join our Telegram channel

Full access? Get Clinical Tree


