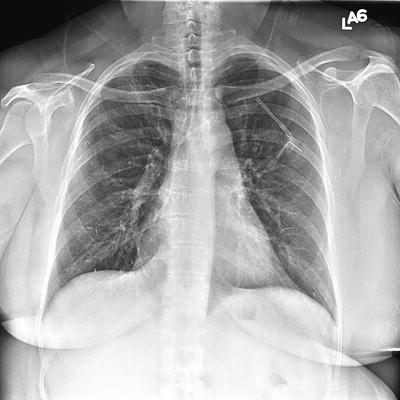
Fig. 19.1
CXR. Left subclavian dual lumen implanted port with pinch-off and kinking of catheter with catheter malfunction
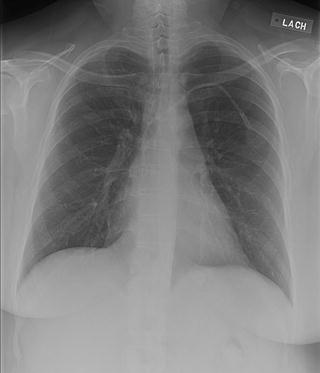
Fig. 19.2
Patient with left subclavian implanted port
Once the vein for access has been chosen, one needs to decide which type of port is to be used. Since there is a high likelihood that our patients will need contrast injection for either CT scans or MRIs, most of our patients will get implanted ports that are rated for pressure injection. Generally, I choose the size of the port proportional to the size of the patient. I use full sized ports for most morbidly obese patients. It is also my preference to use a full sized port for patients who are receiving multi-day infusions, as it seems to provide a more stable platform for access. If the patient is more slender and needs multi-day infusion, an intermediate size port is used. Small, low profile ports are useful for extremely thin patients. If a patient is extremely thin, the pocket for the port may be created deep to the pectoralis fascia for a little more tissue coverage. The size of the catheter is another consideration. In general, smaller sized catheters are preferred. We currently use 6-French and 8-French single lumen catheters. Dual ports are not frequently requested at our institution, but are available with various sized ports and catheters.
Operative Technique
I use an ultrasound probe with an attachable needle guide (Site-Rite) (Fig. 19.4). The needle guide attaches on the side of the ultrasound probe, so that the targeted vein is visualized in cross section. The angle of the needle guide determines the depth at which the needle tip will cross the ultrasound beam. For internal jugular vein access the probe is stabilized by resting it on the clavicle below, lateral to the sternal notch (Fig. 19.5). The appropriate needle guide is used so that the needle crosses the ultrasound beam at the depth of the lumen of the vein. After appropriate local anesthesia, the 21-gauge needle is slowly advanced through the guide (Fig. 19.6). The tissue can be seen moving anterior to the vein. The needle can usually be seen entering the vein, and is imaged within the lumen of the vein. The needle is released from the needle guide and the 0.018″ wire is inserted through the needle and advanced into the superior vena cava. For subclavian vein access, the subclavian vein is also visualized in cross section. The needle guide is directed towards the patient’s feet. After local anesthesia, the 21-gauge needle is slowly advanced through the guide. The tissue anterior to the vein can be seen moving prior to the needle entering the vein. The 0.018″ wire is threaded through the needle into the vein. The vein may also be accessed freehand without the use of a needle guide. Care must be taken to avoid passing the needle too deep, to avoid the underlying lung.
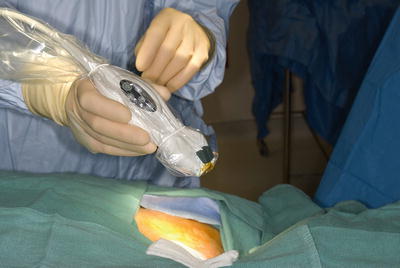
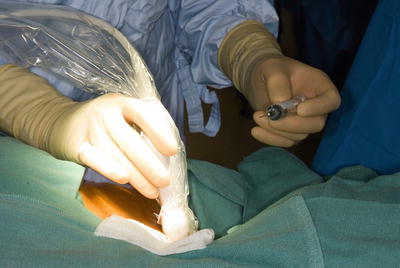
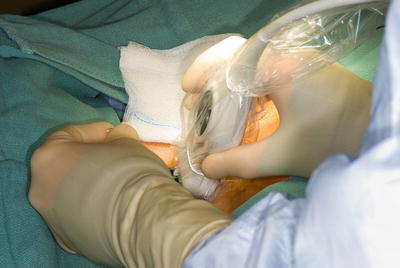

Fig. 19.4
Ultrasound probe with an attachable needle guide (site-rite)

Fig. 19.5
Internal jugular vein access: Ultrasound probe stabilized by resting it on the clavicle below, lateral to the sternal notch

Fig. 19.6
21-gauge needle advanced through needle guide
Techniques for Insertion of Implanted Ports
For over 20 years the subclavian vein was my preferred vein for central venous access. The subclavian vein was accessed using the anatomic landmark technique. In order to help to avoid catheter retraction and malposition, I routinely tape the female patient’s ipsilateral breast inferiorly. I also tape the male chest wall inferiorly if there is considerable laxity in the tissues or significant gynecomastia. This is especially important for morbidly obese patients. The needle entrance site is half way between the sternal notch and acromion, where the clavicle bends posteriorly. After infiltration of local anesthesia, an 18-gauge needle is advanced beneath the clavicle, keeping the needle parallel to the ground, and directing it one fingerbreadth above the sternal notch, while aspirating with the syringe. When venous blood return is obtained, a 0.035″ J-wire is inserted through the needle. The skin incision for the pocket is marked centered upon the wire and parallel to the clavicle. The incision is deepened to the pectoralis fascia and the pocket made inferiorly. An introducer is passed over the J-wire. The catheter is threaded through the introducer, which is then removed. The catheter is positioned so that the tip of the catheter is in the region of the cavoatrial junction. The catheter is trimmed to the appropriate length and attached to the port. The port is positioned within the pocket and sutured to the pectoralis fascia.
With real-time ultrasound guidance, the subclavian vein is accessed with a micro-introducer kit. The ultrasound probe is placed inferior to the clavicle approximately midway between the sternal notch and the acromion. The subclavian vein is accessed with a 21-gauge needle and a 0.018″ wire threaded through the needle. The incision is made centered upon the wire parallel to the clavicle. The pocket is created inferiorly at the level of the pectoralis fascia. A 4-French introducer is passed over the 0.18″ wire, which is exchanged for a 0.035 J-wire. An introducer is passed over the J-wire. The catheter is threaded through the introducer, which is removed. The catheter is positioned so that the tip of the catheter is in the region of the cavoatrial junction. The catheter is trimmed to the appropriate length and attached to the port. The port is positioned within the pocket and sutured to the pectoralis fascia.
When I place a jugular port, I access the internal jugular vein low in the neck, supporting the ultrasound probe on the clavicle inferiorly. The internal jugular vein is accessed using real-time ultrasound guidance using a 21-gauge needle, and a 0.018″ wire is threaded through the needle. The wire position is confirmed with fluoroscopy. The proposed infraclavicular skin incision is marked parallel to the clavicle, and centered upon a point midway between the sternal notch and acromion (in a location similar to my subclavian ports) (Fig. 19.7). The proposed subcutaneous tunnel is marked between the infraclavicular incision and the wire entrance site (Fig. 19.8). Additional local anesthesia is used in the infraclavicular fossa and along the proposed subcutaneous tunnel between the pocket and the wire entrance site. The infraclavicular pocket is created (Figs. 19.9, 19.10, and 19.11). The 0.018″ wire is exchanged for a 0.035″ J-wire (Figs. 19.12 and 19.13). The introducer is passed over the J-wire (Fig. 19.14). The catheter is threaded through the introducer, which is removed (Fig. 19.15). The tunneler is passed from the infraclavicular incision to the cervical incision. The catheter is attached to the tunneler and brought down to the pocket (Fig. 19.16). The catheter tip is positioned in the region of the cavoatrial junction. The catheter is trimmed to the appropriate length and connected to the port with the locking device. The port is positioned within the pocket and sutured to the pectoralis fascia. As can be seen in the operative photographs, I try to isolate the incision(s) with Ray-Tec® sponges, to avoid as much as possible my touching the skin, and to avoid either the catheter or port touching the skin. After hemostasis has been assured, and the port sutured within the pocket, the incision(s) are meticulously closed. I suture the deep subcutaneous tissue with running absorbable suture (4-0 Vicryl), and the dermis with interrupted 4-0 Vicryl deep dermal sutures, followed by subcuticular absorbable monofilament suture (4-0 Monocryl). Further illustration of my technique for insertion of implanted ports has been previously published [5].
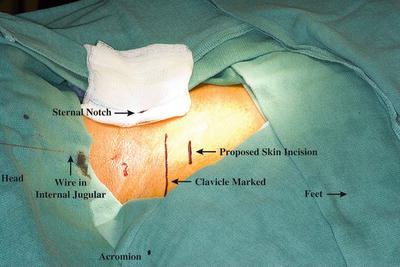
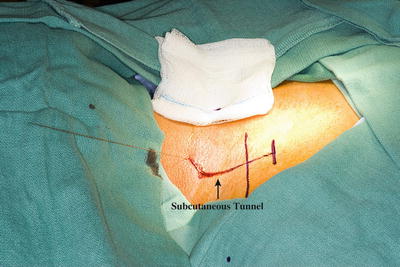

Fig. 19.7
Location of proposed skin incision marked parallel and inferior to clavicle

Fig. 19.8


Location of proposed subcutaneous tunnel marked between infraclavicular incision and wire entering internal jugular vein
Stay updated, free articles. Join our Telegram channel

Full access? Get Clinical Tree


